
🎯 Week 10 Learning Path
Work safely with a cloud backend
- Use a course/development Firebase project, register the exact bundle identifier, and add
GoogleService-Info.plistonly to the app target. - Initialize Firebase and run once before writing authentication or database code.
- Implement one authentication action at a time and display errors without logging passwords.
- Model one Firestore document, then verify create, read, and delete separately in both the app and Firebase console.
- Add loading, empty, and error states so network delay is visible and recoverable.
Security boundary: client validation improves usability; Firebase Security Rules enforce access. Test mode is temporary and must not be used for a deployed app. Never commit credentials, service-account keys, or real user data.
Checkpoint: test signed-out access, a successful request, invalid input, and a denied/offline request. The app should remain responsive and show a useful result in every case.
🚀 Task 1: Setup Firebase Project
Objective
Set up and verify a Firebase development project for an iOS app.
What is Firebase?
Firebase is a platform developed by Google for creating mobile and web applications. It provides a suite of tools that developers can use to build high-quality apps, grow their user base, and earn more money. For iOS developers, it's particularly useful for backend services like authentication, databases, file storage, and more, without needing to manage servers yourself.
🧭 How to read the code blocks
Most snippets in this guide are whole files, and the Firebase-specific parts are usually only a few lines buried in ordinary SwiftUI. Each block marks the lines that matter:
Unmarked lines are supporting Swift and SwiftUI. Tasks 2–3 mostly show complete files, so their blue marks tell you where to look. Task 1 modifies the generated app file and Task 4 modifies files from the previous task, so those edits use green and amber.
0. Follow the lecture slides of this week for the comprehensive visual guide.
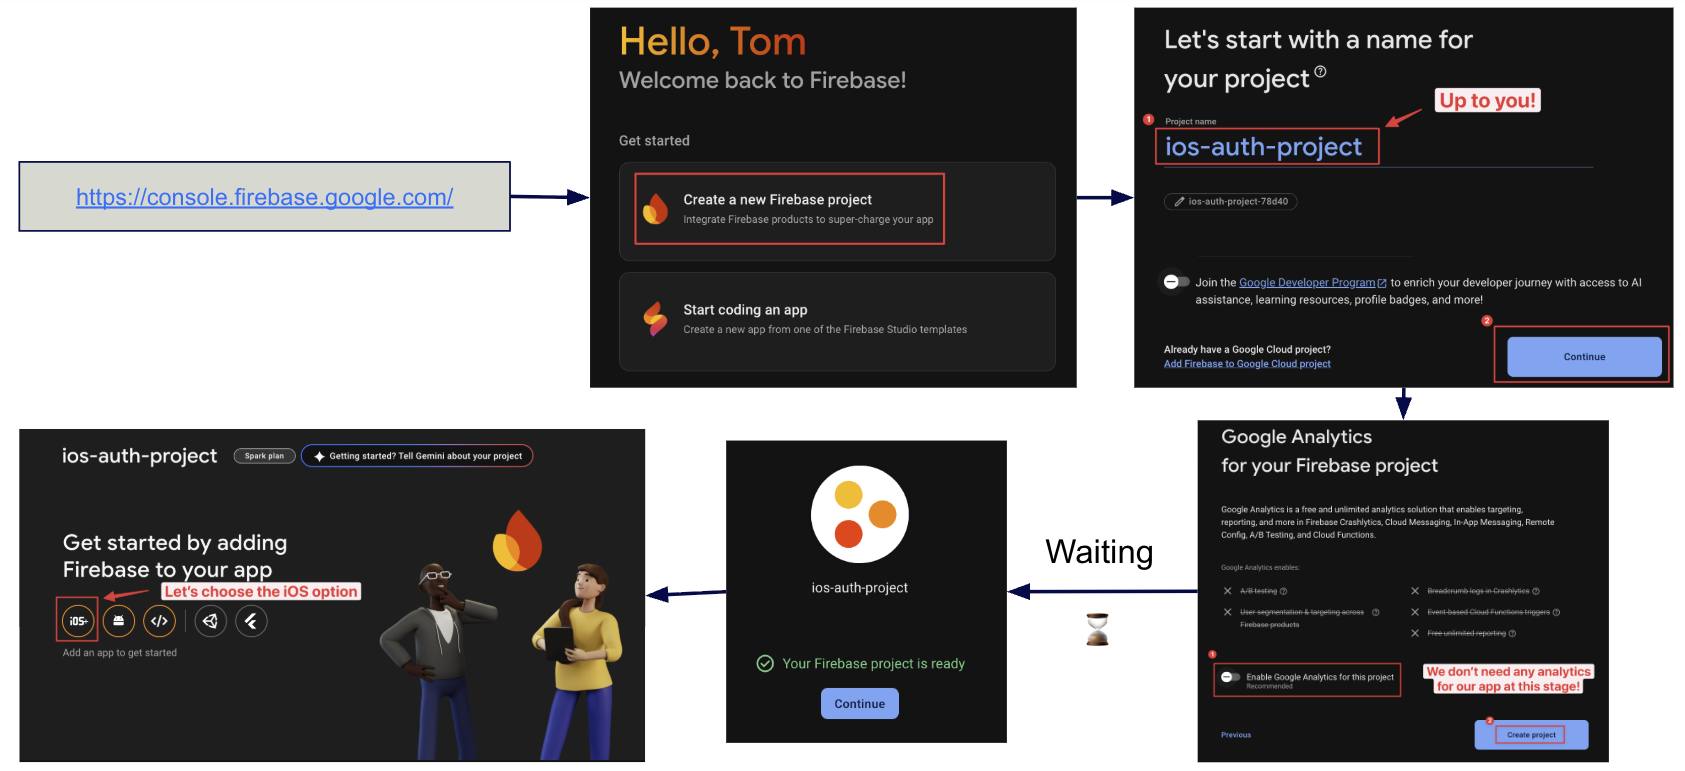
1. Create a new project in Firebase ➕
2. Register Firebase App 📱
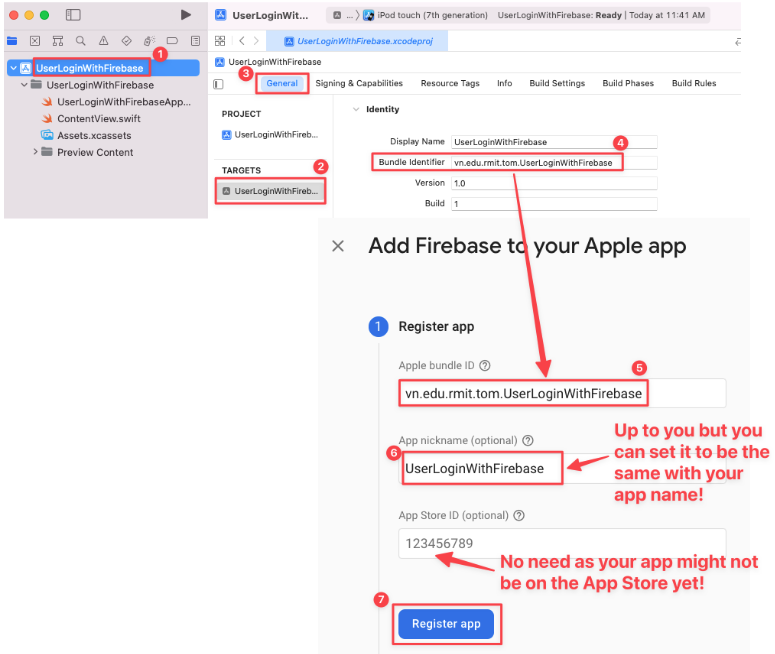
Use your bundle identifier in your Xcode project to register as Apple bundle ID in the Firebase app registration.
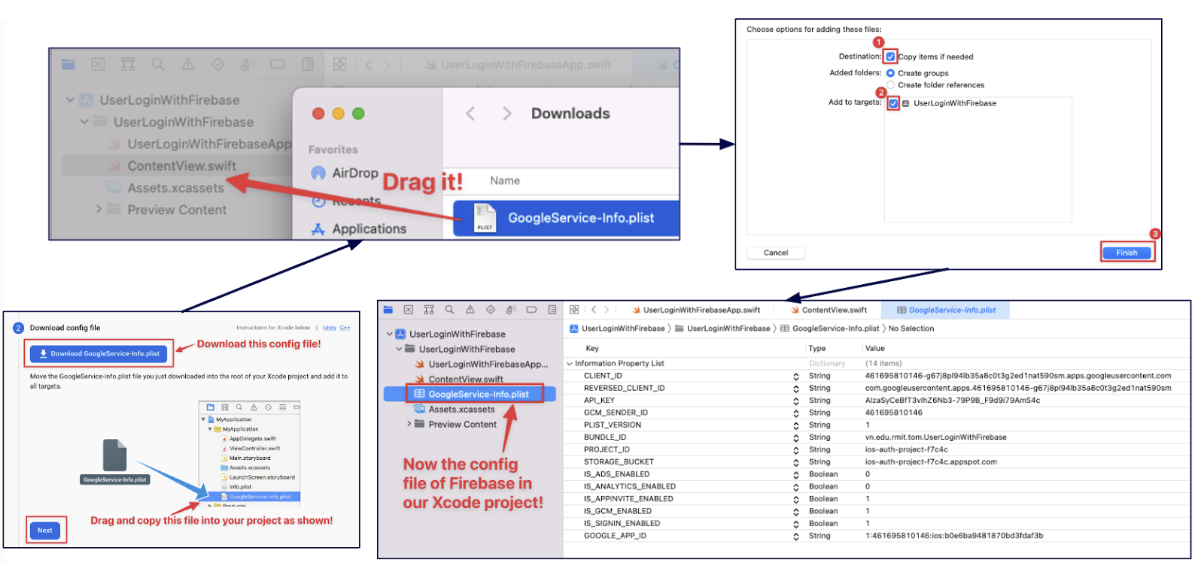
3. Add the Firebase configuration file to the Xcode project ⚙️
This GoogleService-Info.plist file contains all the necessary keys and identifiers
for your app to connect to your specific Firebase project. It's unique to your app.
Security Note 🔒
GoogleService-Info.plist identifies the Firebase app and is included in the
built product. Firebase API keys are public identifiers, not authorization secrets.
Protect data with Firebase Security Rules and App Check, and use a separate Firebase project
for development. Never place service-account credentials or non-Firebase secret keys in the
app or this file.
4a. Add the Firebase SDK as a package in the Xcode project 📦
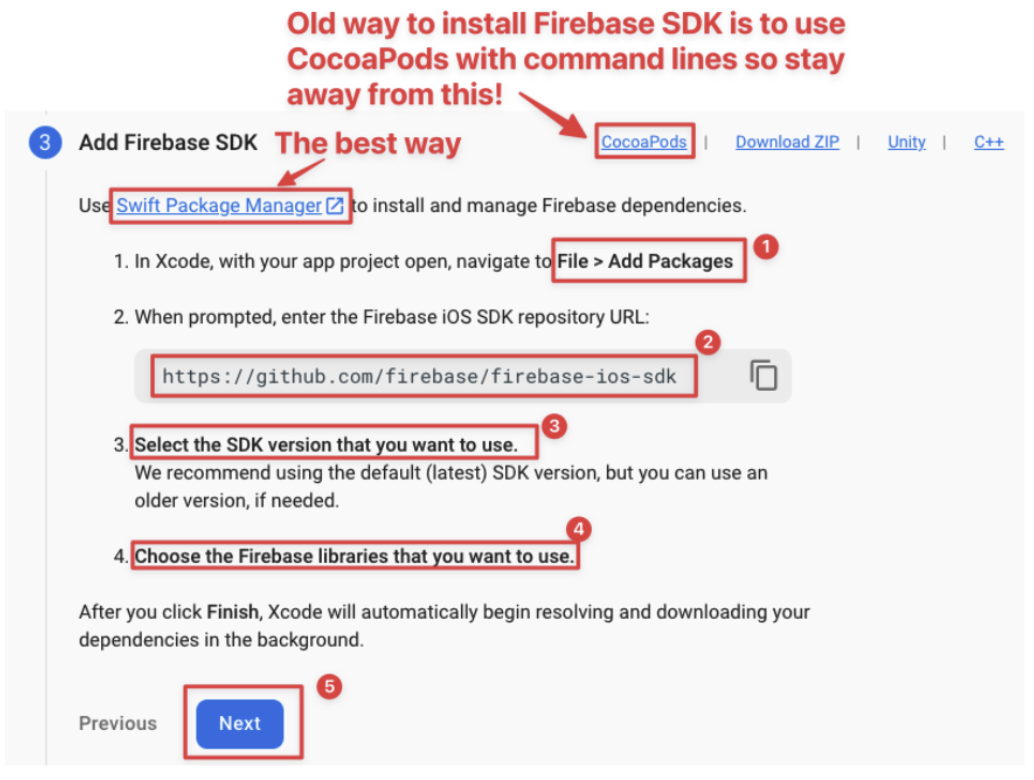
4b. Install Firebase iOS SDK with Swift Package Manager SPM
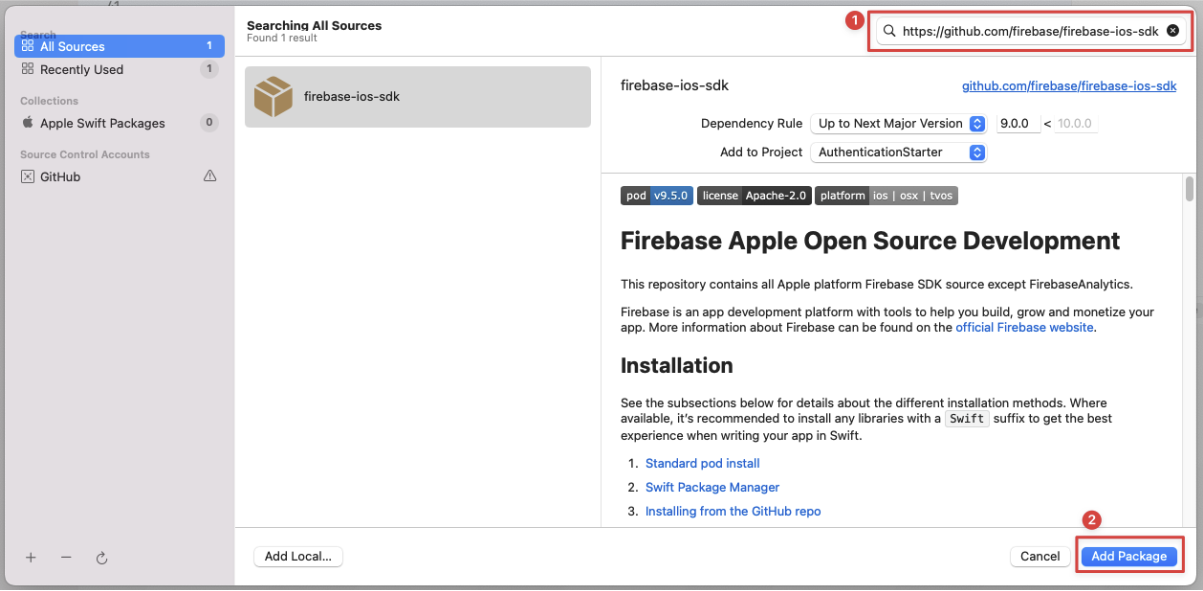
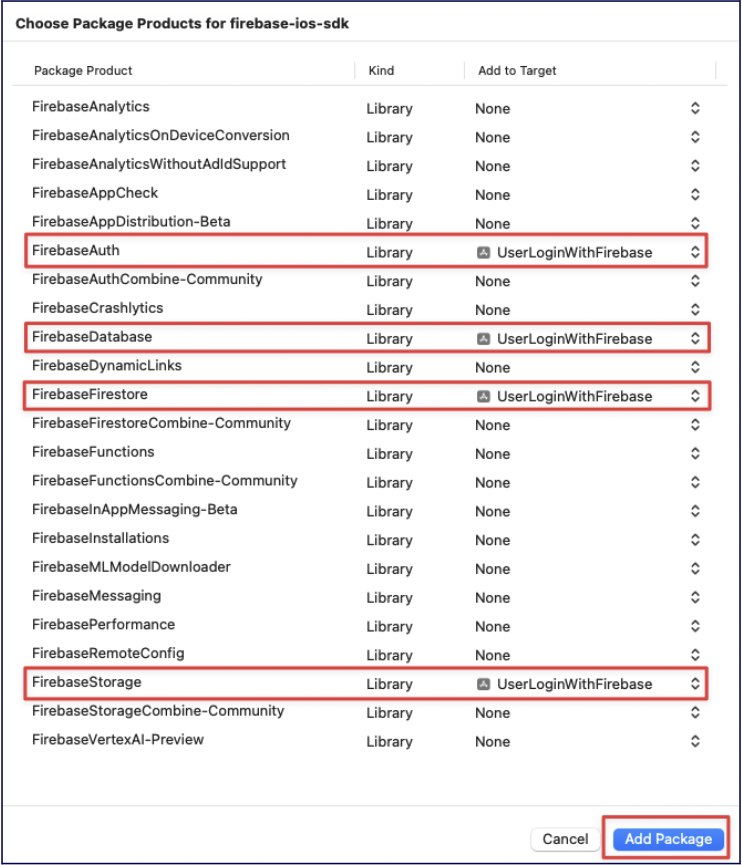
4c. Choose the packages of Firebase you need! ✅
Select only the products the app uses. This guide needs Firebase Authentication and Cloud Firestore:
- Firebase Auth provides many methods and utilities for enabling you to integrate secure authentication into your application.
- Firebase Database (Realtime Database) provides a simple, efficient NoSQL cloud database which is synced across all clients in real time. It's structured as one large JSON tree.
- Firebase Firestore provides a more flexible, scalable NoSQL database from Firebase and Google Cloud. It stores data in documents, which are organized into collections, allowing for more complex queries than the Realtime Database. For most new projects, Firestore is the recommended choice.
- Firebase Storage provides simple storage for uploading and downloading user-generated content like images and videos.
5. Disable app-delegate swizzling for SwiftUI
Select the app target, open the Info tab, and add
FirebaseAppDelegateProxyEnabled under Custom iOS Target Properties. Set its type to
Boolean and its value to NO. Firebase's current SwiftUI setup requires this flag;
products that depend on app-delegate callbacks have product-specific manual setup.
6. Add initialization code ✍️
For a SwiftUI app, configure Firebase from an application delegate and attach it to the
App with @UIApplicationDelegateAdaptor. Keep this setup in one place;
calling FirebaseApp.configure() more than once is an error.
import SwiftUI
import UIKit
import FirebaseCore

final class AppDelegate: NSObject, UIApplicationDelegate {
    func application(
        _ application: UIApplication,
        didFinishLaunchingWithOptions launchOptions:
            [UIApplication.LaunchOptionsKey: Any]? = nil
    ) -> Bool {
        FirebaseApp.configure()
        return true
    }
}

@main
struct YourApp: App {
    @UIApplicationDelegateAdaptor(AppDelegate.self) var delegate

    var body: some Scene {
        WindowGroup {
            ContentView()
        }
    }
}
7. Verify the setup
Build and run the app. Confirm there is no “default app has not yet been configured” message in Xcode's console, then check the Firebase console for the app's installation event before moving to Authentication.
🔐 Task 2: Setup Firebase Authentication
Objective
Set up Firebase Authentication as in the lecture example in this GitHub repo: https://github.com/TomHuynhSG/User-Authentication-iOS-Firebase.
Step 0: Enable the Authentication service in Firebase ✅
Firebase Authentication provides backend services, easy-to-use SDKs, and ready-made UI libraries to authenticate users to your app. It supports authentication using passwords, phone numbers, popular federated identity providers like Google, Facebook and Twitter, and more.
- In the Firebase Console, we need to enable the authentication feature. For this example, we'll enable the "Email/Password" sign-in method.
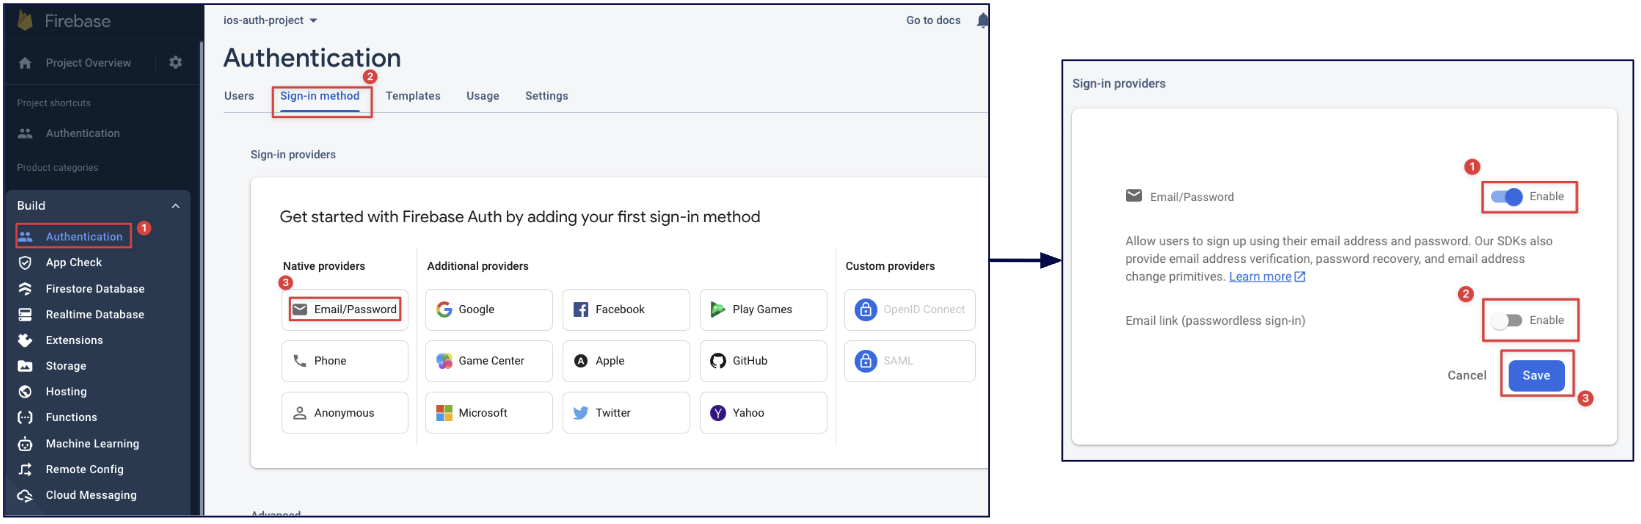
- Create a test user to test authentication
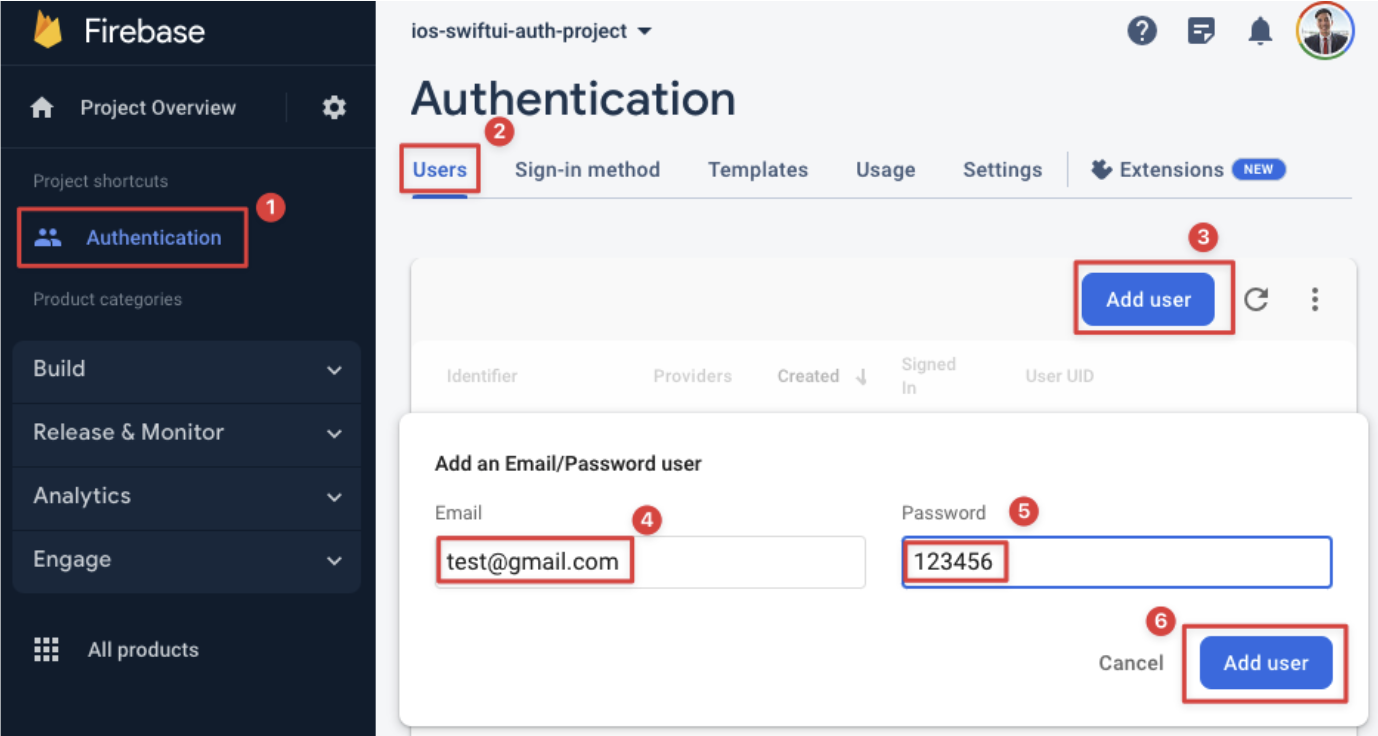
Step 1: Make sure the GoogleService-Info file is in the project directory: 📁
Step 2: Make sure Initialization code is ready: 🚀
Reuse the application-delegate setup from Task 1. Do not add a second
FirebaseApp.configure() call.
Step 3: Create a new "SignUpView" SwiftUI file for the sign-up (register) page: 📝
import SwiftUI
import FirebaseAuth

struct SignUpView: View {
    // The @Environment property wrapper gives us access to values stored in the view's environment.
    // \.dismiss is an action that allows us to programmatically dismiss a view that was presented, like a sheet.
    @Environment(\.dismiss) var dismiss

    @State var email = ""
    @State var password = ""
    @State var passwordConfirmation = ""

    @State var signUpSuccess = false
    @State var statusMessage = ""

    var body: some View {
        VStack{
            Spacer()

            // Sign up fields to sign up for a new account
            Group {
                TextField("Email", text: $email)
                    .padding()
                    .background(.thinMaterial)
                    .clipShape(.rect(cornerRadius: 10))
                    .textInputAutocapitalization(.never)
                SecureField("Password", text: $password)
                    .padding()
                    .background(.thinMaterial)
                    .clipShape(.rect(cornerRadius: 10))
                SecureField("Confirm Password", text: $passwordConfirmation)
                    .padding()
                    .background(.thinMaterial)
                    .clipShape(.rect(cornerRadius: 10))
                    .border(Color.red, width: passwordConfirmation != password ? 1 : 0)
                    .padding(.bottom, 30)
            }

            // Sign up button
            Button(action: {
                signUp()
            }) {
                Text("Sign Up")
                    .bold()
                    .frame(width: 360, height: 50)
                    .background(.thinMaterial)
                    .clipShape(.rect(cornerRadius: 10))
            }

            // Show feedback only after an attempt.
            if !statusMessage.isEmpty {
                Text(statusMessage)
                    .foregroundStyle(signUpSuccess ? .green : .red)
            }

            Spacer()

            // Button to dismiss the sign up sheet and go back to the sign in page
            Button {
                dismiss()
            } label: {
                Text("Back to Sign In Page")
            }
            Spacer()
        }
    }

    // Sign up function to use Firebase to create a new user account in Firebase
    func signUp() {
        guard password == passwordConfirmation else {
            statusMessage = "The passwords do not match."
            signUpSuccess = false
            return
        }

        // This is an asynchronous network call to Firebase.
        // The code inside the closure { ... } will be executed when the network request completes.
        Auth.auth().createUser(withEmail: email, password: password) { authResult, error in
            if let error = error {
                // If there's an error (e.g., email already in use, weak password), print it.
                print(error.localizedDescription)
                signUpSuccess = false
                statusMessage = error.localizedDescription
            } else {
                // If the user was created successfully, the error will be nil.
                print("User created successfully!")
                signUpSuccess = true
                statusMessage = "Account created successfully."
            }
        }
    }
}
Step 4: Modify ContentView for the sign-in page 💻
import SwiftUI
import FirebaseAuth

struct ContentView: View {
    @State var email = ""
    @State var password = ""
    @State var loginSuccess = false
    @State var statusMessage = ""
    @State private var showingSignUpSheet = false

    var body: some View {
        VStack {
            Spacer()

            // Login fields to sign in
            Group {
                TextField("Email", text: $email)
                SecureField("Password", text: $password)
            }

            // Login button
            Button {
                login()
            } label: {
                Text("Sign in")
                    .bold()
                    .frame(width: 360, height: 50)
                    .background(.thinMaterial)
                    .clipShape(.rect(cornerRadius: 10))
            }

            // Show feedback only after an attempt.
            if !statusMessage.isEmpty {
                Text(statusMessage)
                    .foregroundStyle(loginSuccess ? .green : .red)
            }

            Spacer()

            // Button to show the sign up sheet
            Button {
                showingSignUpSheet.toggle()
            } label: {
                Text("Sign Up Here!")
            }
        }
        .padding()
        .sheet(isPresented: $showingSignUpSheet) {
            SignUpView()
        }
    }

    // Login function to use Firebase to check username and password to sign in
    func login() {
        // Similar to signUp, this is an asynchronous call.
        Auth.auth().signIn(withEmail: email, password: password) { (result, error) in
            if let error = error {
                // If there's an error (e.g., wrong password, user not found), print it.
                print(error.localizedDescription)
                loginSuccess = false
                statusMessage = error.localizedDescription
            } else {
                // If login is successful, the error will be nil.
                print("Login successful!")
                loginSuccess = true
                statusMessage = "Signed in successfully."
            }
        }
    }
}
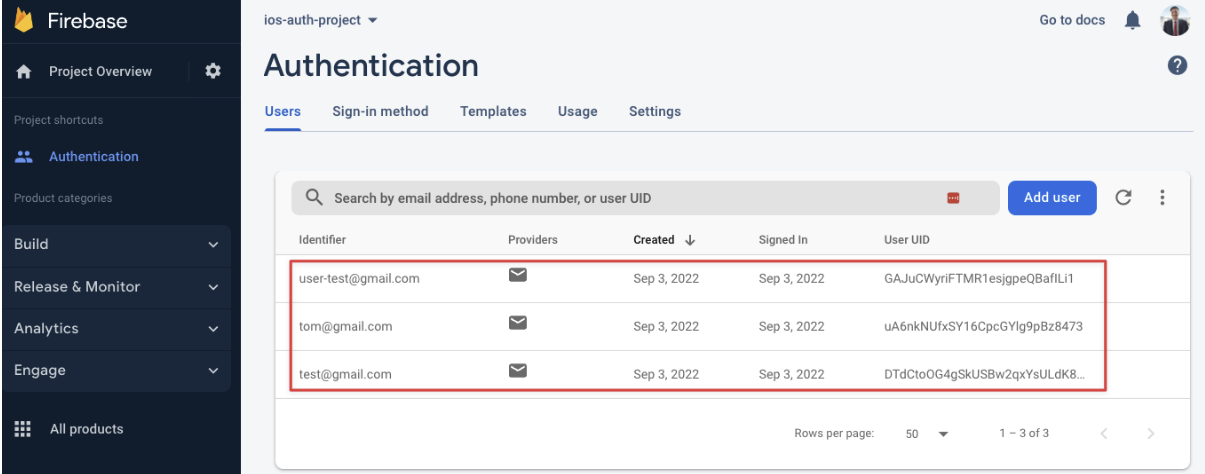
Step 5: Test the sign-up and sign-in features and confirm those accounts in the Firebase Auth Page: 🧪
- Try to sign up to create a new account and later on sign in to log in the app:
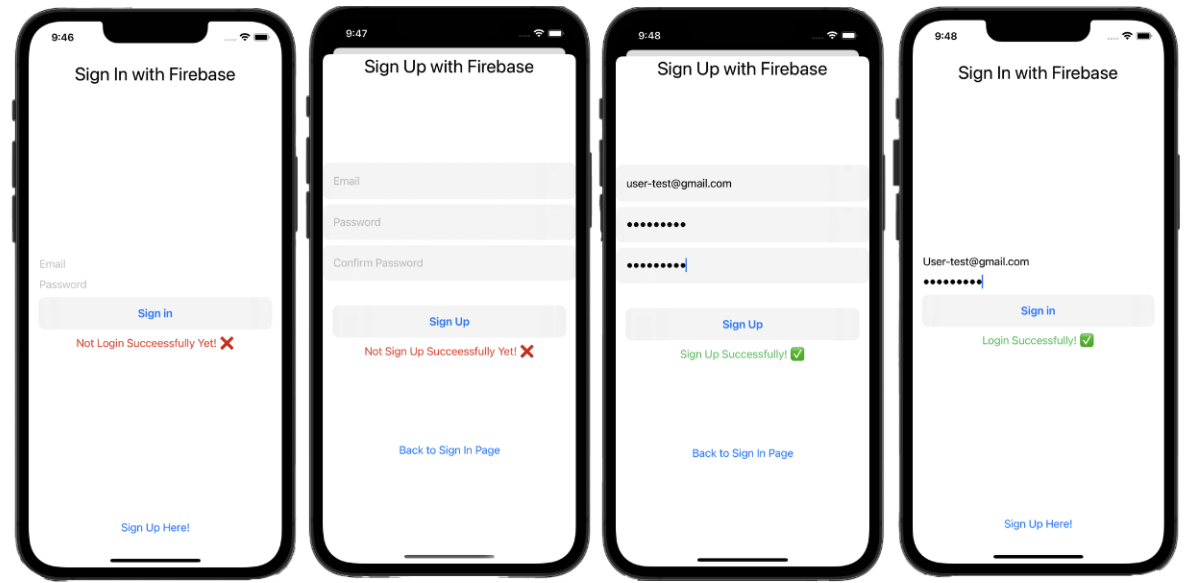
- Also, you can check out these accounts in real time in the Firebase Authentication page:
☁️ Task 3: Setup Firebase Cloud Firestore
Objective
Set up Cloud Firestore as in the lecture example in this GitHub repo: https://github.com/TomHuynhSG/Movie-List-Firestore-iOS-Firebase
Organize the project with the MVVM architecture introduced in Week 9:
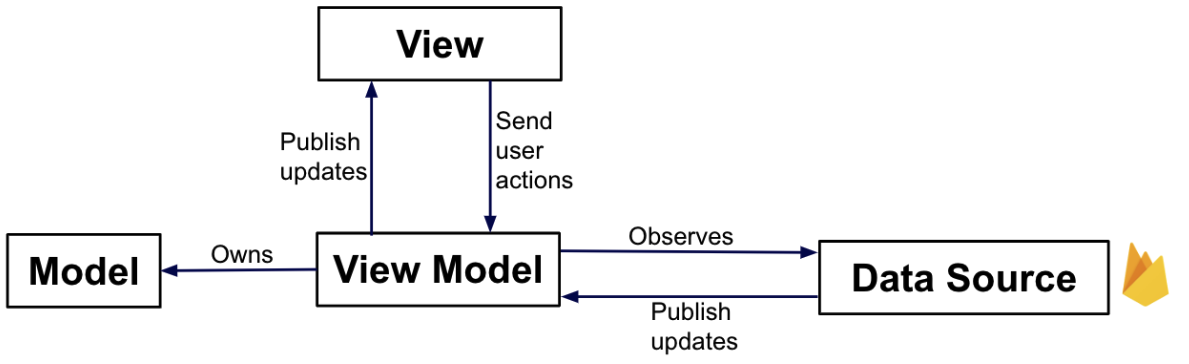
Understanding MVVM
The Model-View-ViewModel (MVVM) pattern helps us separate our code into three distinct roles:
- Model: Represents the data and the business logic. It's the source of
truth for your app's data (e.g., a
Moviestruct). - View: The UI. It's responsible for displaying the data from the
ViewModel and capturing user input. In SwiftUI, this is your
ContentView. The View should be as "dumb" as possible. - ViewModel: Acts as a bridge between the Model and the View. It holds the application's state and presentation logic. It formats the data from the Model in a way that the View can easily display, and it handles user actions from the View.
This separation makes your code easier to test, maintain, and reason about as your app grows in complexity.
Step 0: Create the Cloud Firestore database in Firebase ✅
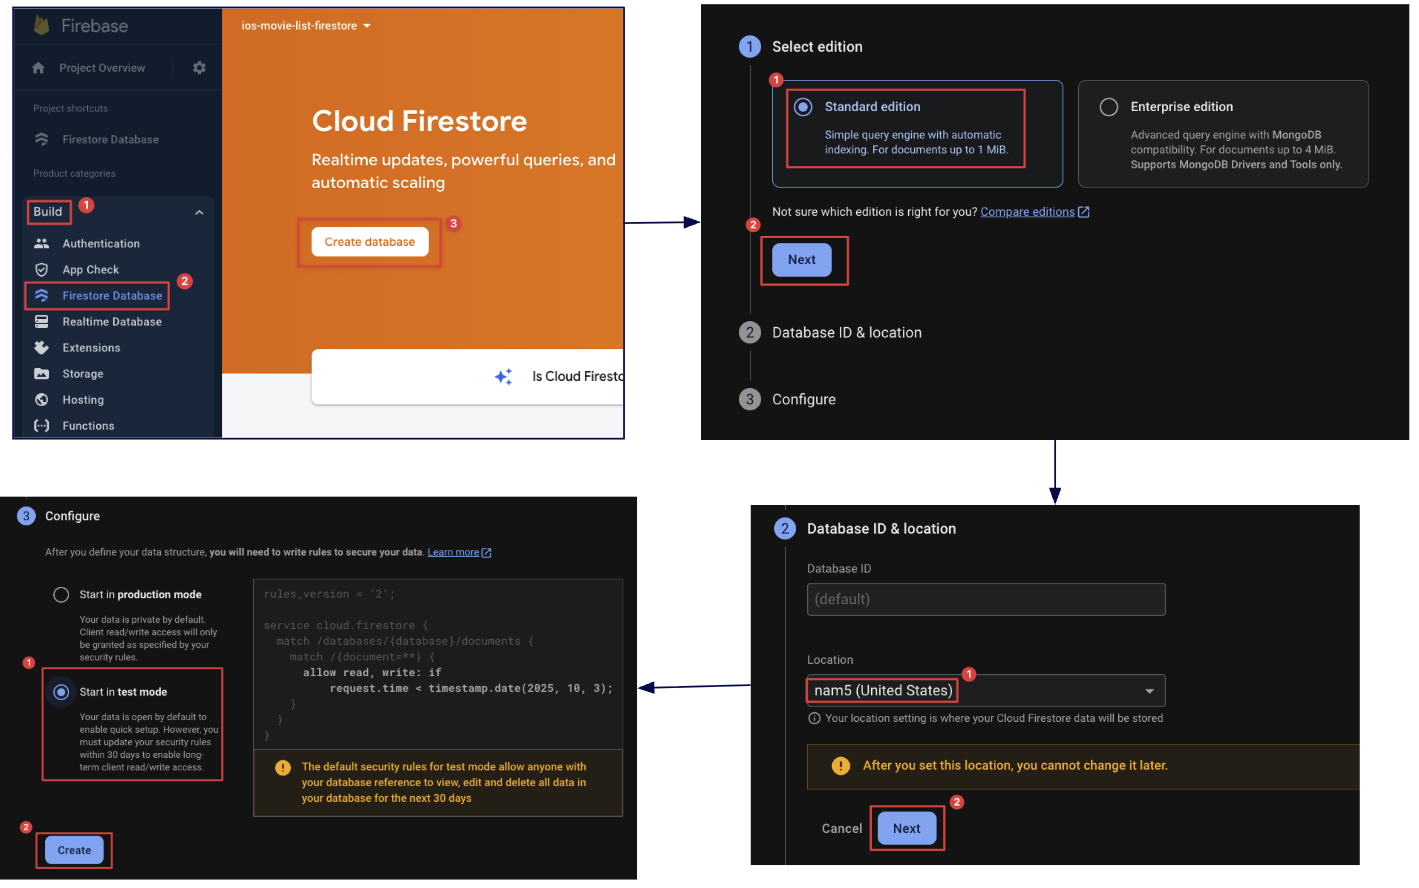
Step 1: Create a Collection & Document in Firestore 📂
Cloud Firestore is a NoSQL document database. Unlike traditional SQL databases with tables and rows, Firestore stores data in documents, which are organized into collections.
- A Collection is like a folder that holds documents. For example, you could
have collections for
users,movies, orproducts. - A Document is a set of key-value pairs, similar to a JSON object. It's where you store your actual data. Each document has a unique ID within its collection.
For this task, you will:
- Create a "movies" Collection.
- Create a document within that collection to hold information about the movie "Deadpool".
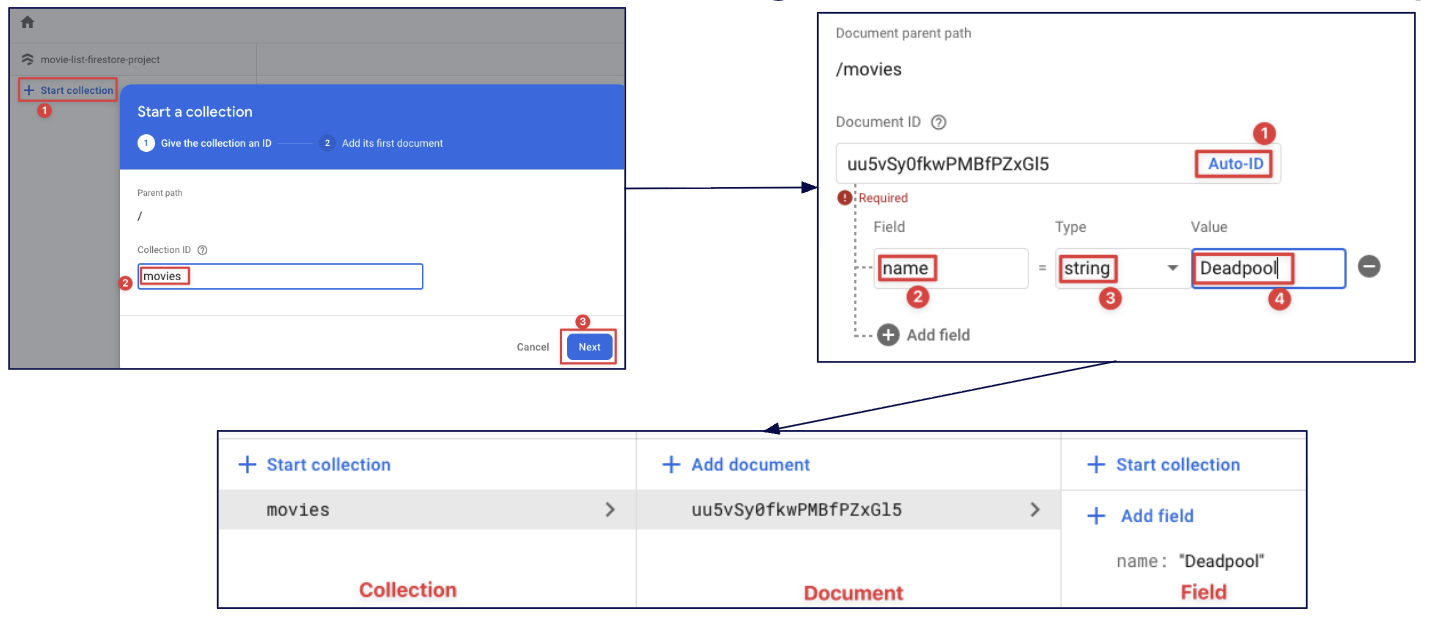
Step 2a: Understand the read and write operations ↔️
- Import & create a firestore object to initialize the connection to Firestore database.
import FirebaseFirestore var db = Firestore.firestore() - Read from Firestore:
- Retrieve a collection
- Loop documents in the collection.
- Extract the data from each field from each document.
// Retrieve the "movies" collection db.collection("movies").addSnapshotListener { (querySnapshot, error) in guard let documents = querySnapshot?.documents else { print("No documents") return } // Loop to get the "name" field inside each movie document self.movies = documents.map { (queryDocumentSnapshot) -> Movie in let data = queryDocumentSnapshot.data() let name = data["name"] as? String ?? "" return Movie(name: name) } } - Write to Firestore:
// add a new document of a movie name in the "movies" collection
db.collection("movies").addDocument(data: ["name": name])
Step 2b: Create Movie.swift as the model 🧱
import Foundation

struct Movie: Codable, Identifiable {
    var id: String = UUID().uuidString
    var name: String?
}
Step 2c: Create MovieViewModel.swift as the view model:
🧠
import Foundation
import FirebaseFirestore

class MovieViewModel: ObservableObject {
    @Published var movies = [Movie]()
    private var db = Firestore.firestore()

    init() {
        getAllMovieData()
    }

    func getAllMovieData() {
        // addSnapshotListener sets up a real-time listener on the "movies" collection.
        // This means that whenever data is added, changed, or removed in this collection on the server,
        // this code block will automatically be re-executed with the updated data.
        // This is what makes Firestore so powerful for building reactive, real-time applications.
        db.collection("movies").addSnapshotListener { (querySnapshot, error) in
            guard let documents = querySnapshot?.documents else {
                print("No documents")
                return
            }

            // We use .map to transform the array of Firestore documents into an array of our `Movie` model objects.
            self.movies = documents.map { (queryDocumentSnapshot) -> Movie in
                let data = queryDocumentSnapshot.data()
                let name = data["name"] as? String ?? ""
                return Movie(name: name)
            }
        }
    }

    func addNewMovieData(name: String) {
        // add a new document of a movie name in the "movies" collection
        db.collection("movies").addDocument(data: ["name": name])
    }
}
Step 2d: Build the Firestore-backed interface in ContentView 🖥️
import SwiftUI

struct ContentView: View {
    @State private var movie: String = ""

    // @StateObject is a property wrapper used to create and manage the lifecycle of a reference type (like our ViewModel) within a view.
    // SwiftUI ensures that this ViewModel instance is created only once for the lifetime of the view and is not destroyed during view updates.
    @StateObject private var movieViewModel = MovieViewModel()

    var body: some View {
        VStack{
            // input field for a movie name
            TextField("Enter a movie name...", text: $movie)
                .padding()
                .border(.black)
                .frame(width: 230, height: 40, alignment: .leading)
                .padding()

            // button to add a movie
            Button {
                self.movieViewModel.addNewMovieData(name: movie)
            } label: {
                Text("Add Movies")
                    .padding()
                    .foregroundStyle(.white)
                    .background(Color.black)
            }

            // List of all movies name fetched from firestore
            NavigationStack {
                List {
                    ForEach(movieViewModel.movies, id: \.id) { movie in
                        Text(movie.name ?? "")
                    }
                }
                .navigationTitle("All Movies")
            }
        }
    }
}
Step 3: Verify real-time updates in the app and Firebase console 🧪
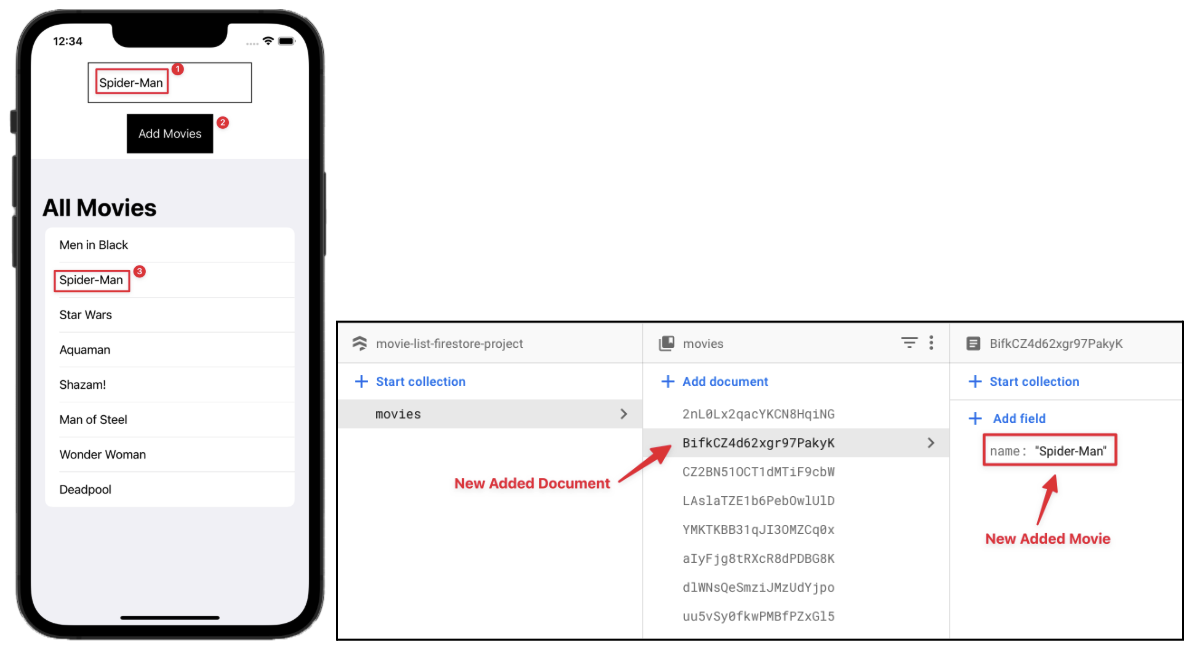
Hints: The full solution code is here: https://github.com/TomHuynhSG/User-Authentication-iOS-Firebase
🗑️ Task 4: Add a Delete Feature
Objective
To modify this Firestore app example so that it allows users to delete movie as well: https://github.com/TomHuynhSG/Movie-List-Firestore-iOS-Firebase
Overall, To add the functionality to remove movies from the list, you can do the following:
- Add a method in MovieViewModel to remove a movie by its document ID.
- Modify the existing Movie struct to include a property for the document ID.
- Update the getAllMovieData method to map the document ID as well when creating a Movie object.
- Add a swipe onDelete in the list view in ContentView, which calls the remove movie method when clicked.
Step 1: Update Movie Struct. Add a documentID property to store the Firestore document ID: 🧱
struct Movie: Codable, Identifiable {
    var id: String = UUID().uuidString
    var name: String?
    var documentID: String?
}
Step 2: Update MovieViewModel. Add a method to remove a movie by its Firestore document ID: 🧠
func removeMovieData(documentID: String) {
    db.collection("movies").document(documentID).delete { (error) in
        if let error = error {
            print("Error removing document: \(error)")
        } else {
            print("Document successfully removed!")
        }
    }
}
Step 3: Update the getAllMovieData method to include the document ID: 🔄
func getAllMovieData() {
    // The same code as before

    self.movies = documents.map { (queryDocumentSnapshot) -> Movie in
        // The same code as before
        let name = ...
        // each returned movie document includes the document ID as well
        return Movie(name: name, documentID: queryDocumentSnapshot.documentID)
    }
}
Step 4: SwiftUI provides built-in functionality to add swipe actions to list items. You can use the onDelete(perform:) modifier to add swipe to delete functionality: 🗑️
The .onDelete modifier can be attached to a ForEach loop within a
List. When a user swipes to delete a row, SwiftUI provides an IndexSet
containing the positions of the rows to be deleted. We can then use this information to identify
the correct document in our database and delete it.
// In ContentView.swift

// List of all movies name fetched from firestore
NavigationStack {
    List {
        ForEach(movieViewModel.movies, id: \.id) { movie in
            Text(movie.name ?? "")
        }
        .onDelete(perform: removeMovie)
    }
    .navigationTitle("All Movies")
}

func removeMovie(at offsets: IndexSet) {
    for index in offsets {
        if let documentID = movieViewModel.movies[index].documentID {
            movieViewModel.removeMovieData(documentID: documentID)
        }
    }
}
Explanation:
- We have modified the List to use a ForEach so we can attach the onDelete(perform:) modifier which provides swipe to delete functionality.
- When a swipe to delete action is triggered, the removeMovie function is called with the indices of the items to be deleted. It then calls removeMovieData(documentID:) to remove each movie from Firestore.
This should give you a "swipe to delete" functionality on each item in the list.
Step 5: Test the app by trying to delete some of the existing movies and check the documents got deleted in real time on the Firestore website: 🧪
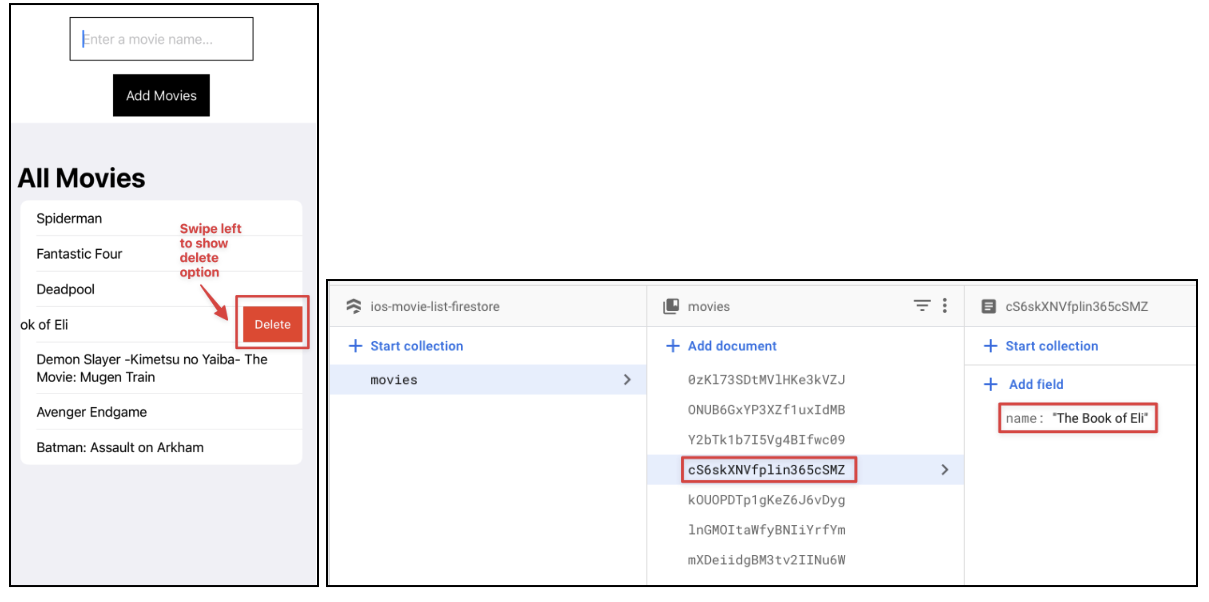
Hints: The full solution code is here: https://github.com/TomHuynhSG/Movie-List-Firestore-iOS-Firebase/tree/add-delete-feature
🧩 Task 5: Combine Two Apps into One
Objective
Given these two Github repo so far which each uses different Firebase services like Authentication (sign-up and sign-in) and Cloud Firestore (NoSQL Real-time Database), please figure out a way to combine two these example apps together into one single app!
- https://github.com/TomHuynhSG/Movie-List-Firestore-iOS-Firebase
- https://github.com/TomHuynhSG/User-Authentication-iOS-Firebase
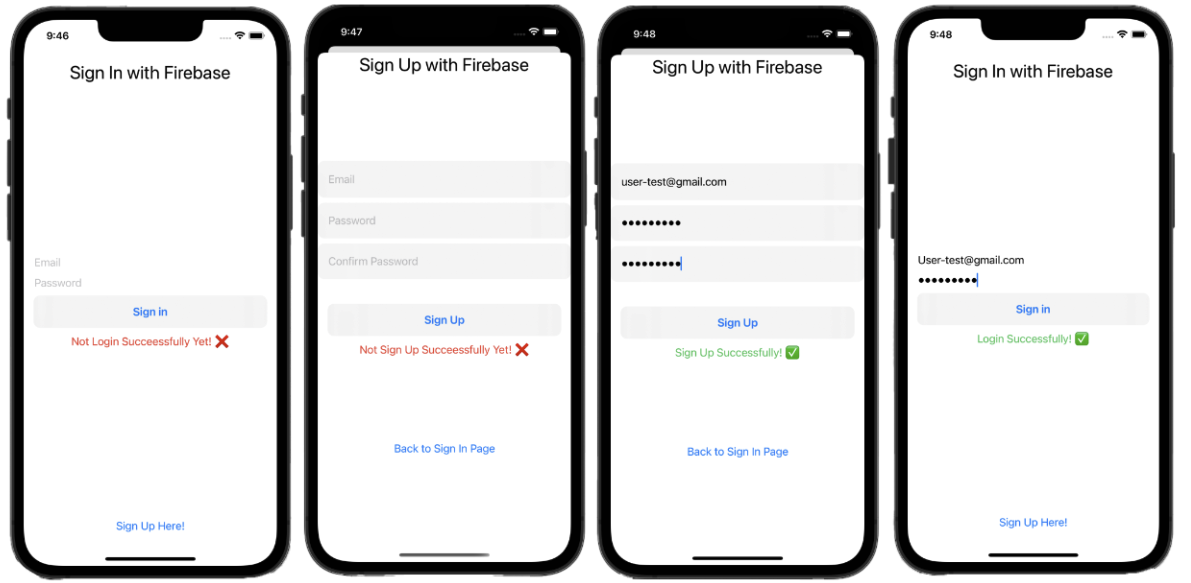
Indeed, when users open the app, instead of going straight into the Movie List view, users are welcomed with a sign-in view and have the option to sign-up if they have not had any account yet. Once they sign up and sign in successfully then they can navigate to the Movie List view where users can add movies or browse a list of movies.
- Before login, users can sign up and sign in:
- After signing in, users now can add movies, browse movies or delete movies.
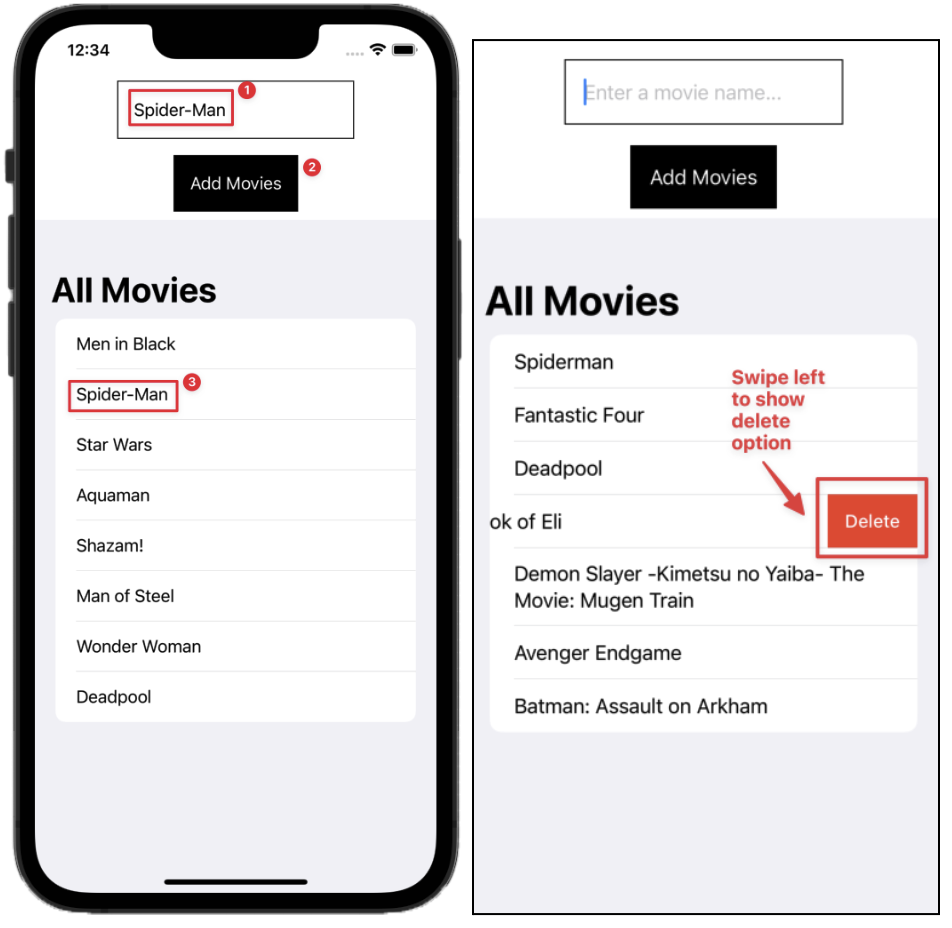
Note, the nice thing is that many users on their own devices (iPhones) can sign up, sign in, add movies and browse movies at the same time! Also, the movie list is somewhat synchronized between different users.
Here are the general steps:
- Go to the Firebase Console and create a new project.
- Inside your project, add a new iOS app. Follow the on-screen instructions.
- Download the GoogleService-Info.plist file and drag it into the root of each Xcode project.
- In the Firebase Console, go to the Authentication section, click "Sign-in method," and enable the Email/Password provider.
- In the Firebase Console, create the Firestore database. Test mode may be used briefly to confirm the first connection, but it allows broad access and expires. Replace it during this lab with rules that require authentication and restrict each user to their own path.
- Run the projects in Xcode. They should now connect to your Firebase backend, and you can start signing up users and adding movies.
Hints: 💡
- After a user logs in with Firebase Authentication, you can get their unique user ID:
let uid = Auth.auth().currentUser?.uid. - When you save data to Firestore, you would change the path to include that user's ID.
Instead of saving to a general "movies" collection, you would save to a user-specific one:
This creates a structure where each user has a "movies" collection under their unique ID. The path makes per-user queries straightforward, but the path alone does not make data private. Firestore Security Rules must verify that// A common and excellent pattern if let uid = Auth.auth().currentUser?.uid { db.collection("users").document(uid).collection("movies").addDocument(data: ["name": "My Favorite Movie"]) }request.auth.uidmatches the user ID in the requested path.
Use this minimum rule for the per-user movie path, then publish it in the Firestore Rules tab:
rules_version = '2';
service cloud.firestore {
  match /databases/{database}/documents {
    match /users/{userId}/movies/{movieId} {
      allow read, write: if request.auth != null
                         && request.auth.uid == userId;
    }
  }
}
Completion check: sign in as two different test users. Each user should see only their own movies, and a signed-out request should be denied by the rules.
🏆 Bonus Challenge: Build a Coffee Order App ☕
Objective
For today's lab, you will build a coffee app to order coffee. The data of the order must be persistent which means the data will be intact even if you close the app and launch it again!
For the data persistence, you need to use either UserDefaults, or Firebase; or the combination of two of them.
Your task:
You need to build the following coffee order app as following:
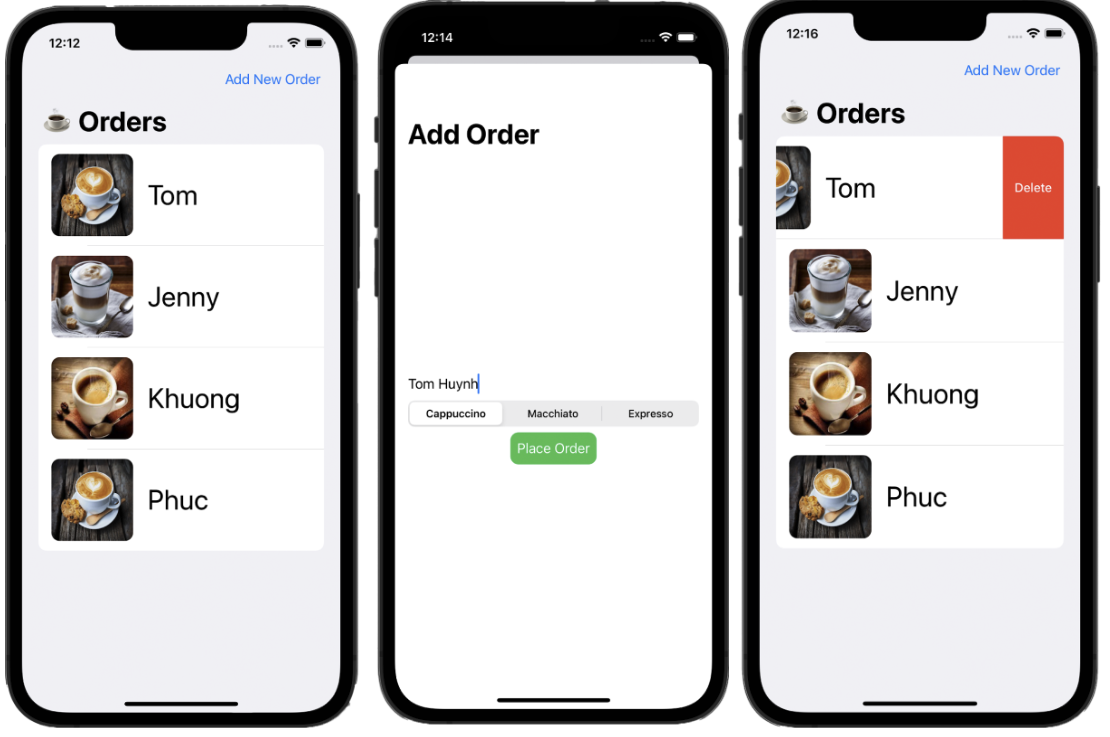
Features:
- Minimum three views: one for displaying the list of coffee orders, one for adding a new coffee order, and one for displaying the detailed information of an order.
- Each type of coffee has its own distinct image showing on the coffee order list.
- Also, you can delete an order by swiping left on the order you want to delete and press delete.
- The design of your app could be different from the sample screenshots so feel free to be creative and make something different!
Requirements:
- Build this coffee app using appropriate different ways of data persistence to store the
coffee order details:
- UserDefaults
- Firebase
Note: for Firebase, you need to use your own personal gmail account as it is not possible to use the RMIT account to use Firebase service.
Helpful Materials:
- An example of using Firestore of Firebase: https://github.com/TomHuynhSG/movie-list-firestore-ios-firebase
- An example of using Firebase authentication: https://github.com/TomHuynhSG/user-authentication-ios-firebase
- An example of using UserDefaults: https://github.com/TomHuynhSG/RMIT-casino
- Firebase documentation for iOS: https://firebase.google.com/docs/ios/setup
- Firebase iOS SDK: https://github.com/firebase/firebase-ios-sdk
- UserDefault guide: Lecture 8 - RMIT Casino part 2
- Firebase guide: Lecture 10 - Data Persistence with Firebase
- Picker view component: