
🎯 Week 5 Learning Path
The JSON pipeline
Loading data is a sequence: locate bytes → decode bytes → store typed values → render views. Diagnose the stage that failed instead of changing all four stages at once.
- Run the finished Part 1 project and commit or copy a known-good version.
- Add
contacts.jsonto the app target and verify its target membership. - Make
Contactconform toCodable; JSON keys and Swift property types must agree. - Decode the bundled file and confirm the expected contact count before changing any views.
- Only then try remote data or the
@State/@Bindingwelcome screen.
Checkpoint: introduce one deliberate JSON error, read the decoding message, then undo the error. You should be able to tell the difference between “file not found” and “data could not be decoded.”
Networking note: bundled JSON can be loaded synchronously during this exercise.
Remote requests should use URLSession asynchronously so the interface remains
responsive; never treat a network response as guaranteed or immediate.
🎯 Lab Objective
🎯 Objective
The goal of this part is to transition from hardcoded data to a more flexible data source: a JSON
file. You will learn how to create a JSON file, make your data model Codable, and
write a function to parse the JSON data into Swift objects that your views can use. This
decouples your data from your application logic, making it easier to manage and update in the
future.
🔑 Key Concepts
- JSON (JavaScript Object Notation): A lightweight, human-readable format for data interchange.
- Codable: A Swift protocol that allows objects to be converted to and from an external representation like JSON.
- Bundle: A representation of the code and resources stored in your app's directory. We'll use it to find our JSON file.
- JSONDecoder: A Swift object that decodes instances of a data type from JSON objects.
🔗 Where Part 1 left off
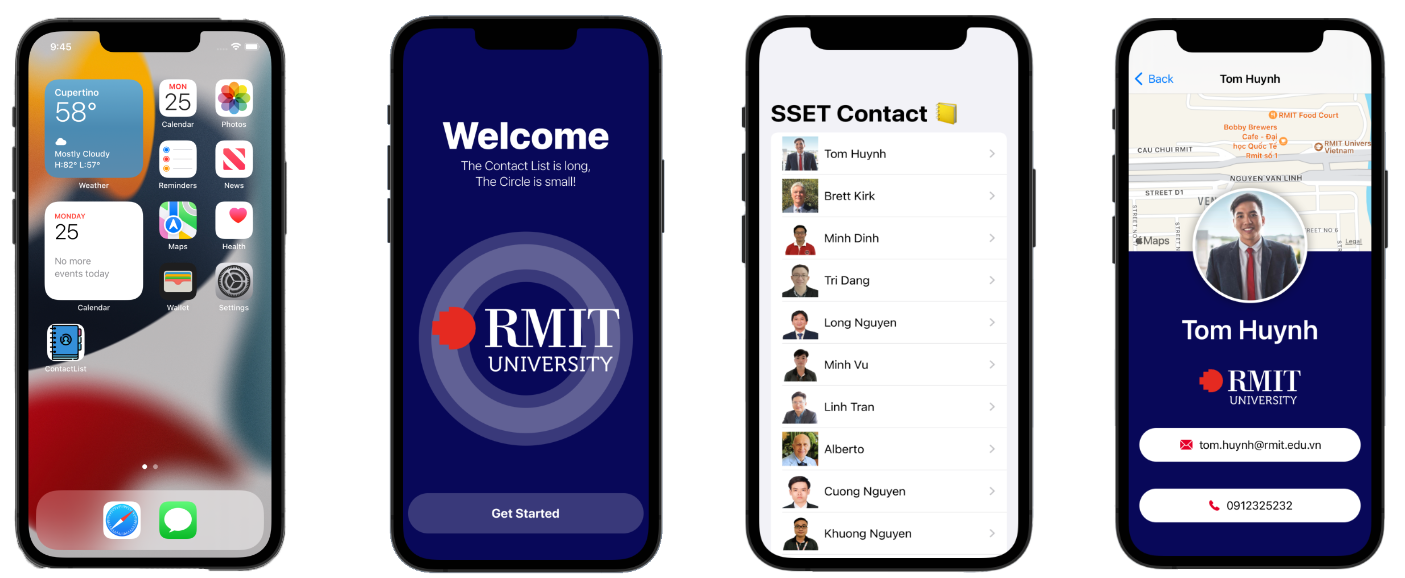
Open the project you finished in Part 1. At the moment your data layer looks like this:
Contact.swift, a struct withvar id: UUID = UUID(), fourStringproperties, a computedimage, and a storedlocationCoordinate: CLLocationCoordinate2D.ModelData.swift, a hardcodedlet contacts: [Contact] = [ ... ]with fourteen people typed out by hand.
Everything you build in Part 2 happens in those two files plus one new JSON file. Here is the whole refactor at a glance, so nothing later comes as a surprise:
id: UUIDbecomesid: Int. The JSON file now supplies the identifier, so we stop generating one.ContactgainsCodable, soJSONDecodercan build one from JSON.locationCoordinatebecomes computed. The stored value turns into a smallCoordinatesstruct that mirrors the JSON, andlocationCoordinateis derived from it.let contacts = [...]→var contacts = decodeContacts(from: ...). The array is now produced at runtime by a decoding function.
What does not change: any of your views.
ContactList, ContactRow, ContactCard,
CircleView, InfoView and MapView are untouched, because
they still see an array called contacts whose elements still answer to
name, email, phone, image and
locationCoordinate. Swapping a data source without touching the UI is the entire
point of this lab, and it only works because Part 1 kept the model and the views
separate.
How to read the code blocks
As in Part 1, each snippet marks the lines that matter for that step, so you can see at a glance what you are changing in a file you already wrote:
Unmarked lines are unchanged from Part 1. In a brand-new file every line is new, so only the lines worth pausing on are highlighted in blue.
📄 1. Creating the JSON Data File
Step 1.1: Create contacts.json
Instruction: You have two options to add the contacts.json file to
your project:
- Option 1 (Create New File): In the "Model" folder, create a new file.
Choose the "Empty" template under the "Other" section, name it
contacts.json, and then copy and paste the provided JSON data into this new file. - Option 2 (Drag and Drop): If you already have the
contacts.jsonfile on your computer (e.g., in Finder), you can directly drag and drop it into the "Model" folder in Xcode's Navigator. Make sure to check the "Copy items if needed" (for Xcode 15 and older) or "Copy files to destination" (for Xcode 16 and newer) checkbox when prompted.
Explanation: We are externalizing our data. Instead of being compiled into the
app as Swift code, the data now lives in a separate resource file that is copied into the app
as-is. Notice how the keys ("name", "email", …) match the
property names in your Contact struct. That name matching is what lets
Swift decode the file automatically in Step 2.1.
If you have never read JSON before, the whole format is four ideas: square brackets are an array, curly braces are an object (a set of key/value pairs), keys and text values go in double quotes, and numbers do not. Two rules bite beginners constantly:
- No comments. JSON has no
//or/* */. A single comment makes the whole file fail to decode. - No trailing commas. The last item in an array or object must not be followed by a comma.
The "id" key is new. In Part 1 each contact generated its own
UUID; now the identifier comes from the data itself, which is how real APIs and
databases work.
Model/contacts.json
[
    {
      "email": "tom.huynh@rmit.edu.vn",
      "id": 1,
      "phone": "091232522",
      "imageName": "tom-huynh",
      "name": "Tom Huynh",
      "coordinates": {
          "latitude": 10.729410965174186,
          "longitude": 106.69522548892152
      }
    },
    {
      "email": "brett.kirk@rmit.edu.vn",
      "id": 2,
      "phone": "094355634",
      "imageName": "brett-kirk",
      "name": "Brett Kirk",
      "coordinates": {
          "latitude": 10.758256325746386,
          "longitude": 106.67228491141948
      }
    },
    {
      "email": "minh.dinh4@rmit.edu.vn",
      "id": 3,
      "phone": "0853453563",
      "imageName": "minh-dinh",
      "name": "Minh Dinh",
      "coordinates": {
          "latitude": 10.786710386116287,
          "longitude": 106.73818415444727
      }
    },
    {
      "email": "tri.dangtran@rmit.edu.vn",
      "id": 4,
      "phone": "0674868566",
      "imageName": "tri-dang",
      "name": "Tri Dang",
      "coordinates": {
          "latitude": 10.79437079611712,
          "longitude": 106.80394039521534
      }
    },
    {
      "email": "long.nguyenminh@rmit.edu.vn",
      "id": 5,
      "phone": "0962456754",
      "imageName": "long-nguyen",
      "name": "Long Nguyen",
      "coordinates": {
          "latitude": 10.870169083568735,
          "longitude": 106.76307939055084
      }
    },
    {
      "email": "minh.vu@rmit.edu.vn",
      "id": 6,
      "phone": "0934634534",
      "imageName": "minh-vu",
      "name": "Minh Vu",
      "coordinates": {
          "latitude": 10.949713377874208,
          "longitude": 106.8479555990988
      }
    },
    {
      "email": "linh.tranduc@rmit.edu.vn",
      "id": 7,
      "phone": "095463745",
      "imageName": "linh-tran",
      "name": "Linh Tran",
      "coordinates": {
          "latitude": 11.04578475693659,
          "longitude": 106.58373092288061
      }
    },
    {
      "email": "alberto@rmit.edu.vn",
      "id": 8,
      "phone": "094354456",
      "imageName": "alberto",
      "name": "Alberto",
      "coordinates": {
          "latitude": 10.803071448238558,
          "longitude": 106.64427589071033
      }
    },
    {
      "email": "cuong.nguyen@rmit.edu.vn",
      "id": 9,
      "phone": "0922342355",
      "imageName": "cuong-nguyen",
      "name": "Cuong Nguyen",
      "coordinates": {
          "latitude": 10.781771420238698,
          "longitude": 106.6306334151885
      }
    },
    {
      "email": "khuong.nguyen@rmit.edu.vn",
      "id": 10,
      "phone": "09453346323",
      "imageName": "khuong-nguyen",
      "name": "Khuong Nguyen",
      "coordinates": {
          "latitude": 10.745642963019284,
          "longitude": 106.57460623743862
      }
    },
    {
      "email": "luan.nguyen@rmit.edu.vn",
      "id": 11,
      "phone": "0925342356",
      "imageName": "luan-nguyen",
      "name": "Luan Nguyen",
      "coordinates": {
          "latitude": 10.642054789728482,
          "longitude": 106.43875526875854
      }
    },
    {
      "email": "minh.tran@rmit.edu.vn",
      "id": 12,
      "phone": "0952534523",
      "imageName": "minh-tran",
      "name": "Minh Tran",
      "coordinates": {
          "latitude": 10.23862895243684,
          "longitude": 106.3776103458168
      }
    },
    {
      "email": "sam.goundar@rmit.edu.vn",
      "id": 13,
      "phone": "095534534",
      "imageName": "sam-goundar",
      "name": "Sam Goundar",
      "coordinates": {
          "latitude": 9.991073220047838,
          "longitude": 106.0169751879182
      }
    },
    {
      "email": "ushik.shrestha@rmit.edu.vn",
      "id": 14,
      "phone": "0922345123",
      "imageName": "ushik-shrestha",
      "name": "Ushik Shrestha",
      "coordinates": {
          "latitude": 11.940952669293084,
          "longitude": 108.45964507946036
      }
    }
]
This is the complete data set. Every object has all six keys, and only the last object in the array goes without a trailing comma.
Step 1.2: Check the file is actually shipped with the app ⚠️
Instruction: Select contacts.json in the Project Navigator, open
the File Inspector on the right (⌥⌘1), and confirm that
SSETContactList is ticked under Target Membership. You can double-check
from the other direction too: select the project at the top of the navigator → your target
→ Build Phases → Copy Bundle Resources, and look for
contacts.json in the list.
Explanation: Swift files are compiled into your app; resource files are only copied into it, and only if they belong to the target. A dragged-in file with the checkbox unticked sits happily in your project, shows up in the navigator, and is completely invisible at runtime, which is why the loader in Step 3.1 would crash with "Couldn't load contacts.json". Thirty seconds here saves a very confusing half hour later.
While you are at it, make sure the file really is named contacts.json and not
contacts.json.txt; Finder hides known extensions by default.
🔄 2. Updating the Data Model
Step 2.1: Make the Contact Struct Codable
Instruction: Modify your Contact.swift file from Part 1. Add
Codable to the conformance list, change id to an Int,
replace the stored locationCoordinate with a stored coordinates
property plus a computed locationCoordinate, and add a small
Coordinates struct at the bottom of the file.
Explanation: Codable is simply
Decodable & Encodable combined. Conform to it and the compiler writes the
JSON-reading and JSON-writing code for you, on one condition: it must be able to pair every
stored property with a key of the same name and a compatible type. That single
rule explains every change in this file:
var id: Int. The JSON says"id": 1, so the property must be anInt. We also drop the= UUID()default, because an identifier that is randomly regenerated every time the app launches is not much of an identifier.Identifiableis still satisfied: it only asks for anidthat isHashable, andIntis.var coordinates: Coordinates. The JSON nests latitude and longitude inside a"coordinates"object, so we mirror that shape with a struct of our own. Nesting in JSON becomes nesting in your types.- Why not decode straight into
CLLocationCoordinate2D? Because Apple's type is notCodable, so the compiler could not synthesise anything. We store a type we control and expose the Apple one through a computed property. - Computed properties are free.
imageandlocationCoordinatestore nothing, soCodableignores them entirely, so no"image"key is needed in the JSON, and a non-Codable type like SwiftUI'sImagecauses no trouble at all. This is the trick that keepsMapView(location: contact.locationCoordinate)inContactCardcompiling without a single edit.
If the names don't line up: when a JSON key cannot match a Swift property
("user_name", or a key that is a Swift keyword), you add a
CodingKeys enum to map between them. You will meet a real case of this in the bonus
challenge, where the API sends mal_id.
Pro Tip: For complex JSON, writing Codable structs by hand can be
tedious. Tools like QuickType can
instantly generate the necessary Swift structs from a sample JSON, saving you time and
preventing typos.

// Model/Contact.swift
import Foundation
import SwiftUI
import CoreLocation

struct Contact : Identifiable, Codable {
    var id: Int
    var name: String
    var email: String
    var phone: String
    var imageName: String

    var image: Image {
        Image(imageName)
    }

    var coordinates: Coordinates

    // Computed property to expose the CLLocationCoordinate2D, keeping your view code unchanged
    var locationCoordinate: CLLocationCoordinate2D {
        CLLocationCoordinate2D(
            latitude: coordinates.latitude,
            longitude: coordinates.longitude
        )
    }
}

// Nested struct to match the structure of the "coordinates" object in the JSON
struct Coordinates: Codable {
    var latitude: Double
    var longitude: Double
}
📥 3. Loading the Data from JSON
Step 3.1: Update ModelData.swift
Instruction: Delete the entire hardcoded array from
ModelData.swift, all fourteen lines of it, and replace the file's
contents with the loader below. Yes, deleting the data you carefully typed in Part 1 is the
point.
Explanation: The function walks through three stages, and each one can fail for a different reason:
Bundle.main.url(forResource:withExtension:)asks "is there a file with this name inside my installed app?". The bundle is the folder that actually gets installed on the device: your compiled code plus every resource that was ticked into the target in Step 1.2. We passwithExtension: nilbecause the extension is already part of the string"contacts.json".Data(contentsOf: file)reads those bytes off disk.try?means "give menilinstead of throwing if this fails".decoder.decode([Contact].self, from: data)turns the bytes into Swift values.[Contact].selfis how you hand a type itself to a function. you are telling the decoder "expect an array of Contact", and the square brackets matter, because the JSON's outermost character is[.
Notice that the decoding step uses a full do/catch rather than
try?. That is deliberate: the error thrown by JSONDecoder names the
exact key or type that went wrong, and printing it in the fatalError turns a
baffling crash into a one-line diagnosis. fatalError is a blunt instrument that
stops the app dead, but during development, failing loudly and immediately beats
limping along with an empty screen.
Two details worth pausing on:
- The final
return [ ]is the "found it but couldn't read it" path. Theelsebelongs to the outerif let, so a missing file crashes loudly, but a file that exists and cannot be read falls through and hands back an empty array. If your app ever launches to a completely empty list without crashing, this is the branch you landed on. contactsis now avar, and globals in Swift are lazy. The decoding does not happen at launch; it happens the first time anything readscontacts, which in practice is the first timeContactListdraws itsList.
// Model/ModelData.swift
import Foundation
import MapKit

var contacts = decodeContacts(from: "contacts.json")

// Decode contacts from a bundled JSON file.
func decodeContacts(from fileName: String) -> [Contact] {
    if let file = Bundle.main.url(forResource: fileName, withExtension: nil){
        if let data = try? Data(contentsOf: file) {
            do {
                let decoder = JSONDecoder()
                let decoded = try decoder.decode([Contact].self, from: data)
                return decoded
            } catch let error {
                fatalError("Failed to decode JSON: \(error)")
            }
        }
    } else {
        fatalError("Couldn't load \(fileName) file")
    }
    return [ ] as [Contact]
}
Now run the app. It should look and behave exactly as it did at the end of Part 1. That is the win: you replaced the entire data source and the user cannot tell.
Step 3.2: When it doesn't work (read this before panicking)
Decoding failures are the most common way this lab goes wrong, and the fix is almost always one of five things. Xcode prints the reason in the console at the bottom of the window, so read that message before changing anything.
- "Couldn't load contacts.json" then a crash. The file is not in the app bundle. Go back to Step 1.2 and tick Target Membership.
keyNotFound ... "coordinates". Your JSON is missing a key that a stored property needs, or the spelling differs. Swift is case sensitive, soimagenamewill never fillimageName.typeMismatch ... Expected to decode Int but found a string. Usually"id": "1"with quotes around the number, or a phone number written as a number when the struct saysString.dataCorrupted. The file is not valid JSON. Look for a trailing comma before a closing bracket, a leftover//comment, or curly quotes that crept in from a word processor. Pasting the file into a JSON validator finds it in seconds.- The list is empty but nothing crashed. That is the silent
return [ ]path described above.
A quick sanity check while debugging: add
print("Loaded \(contacts.count) contacts") inside an
.onAppear { } on ContactList. If it prints 14, your data layer is
healthy and any remaining problem lives in the views.
🌐 4. Optional: Loading Data from a URL
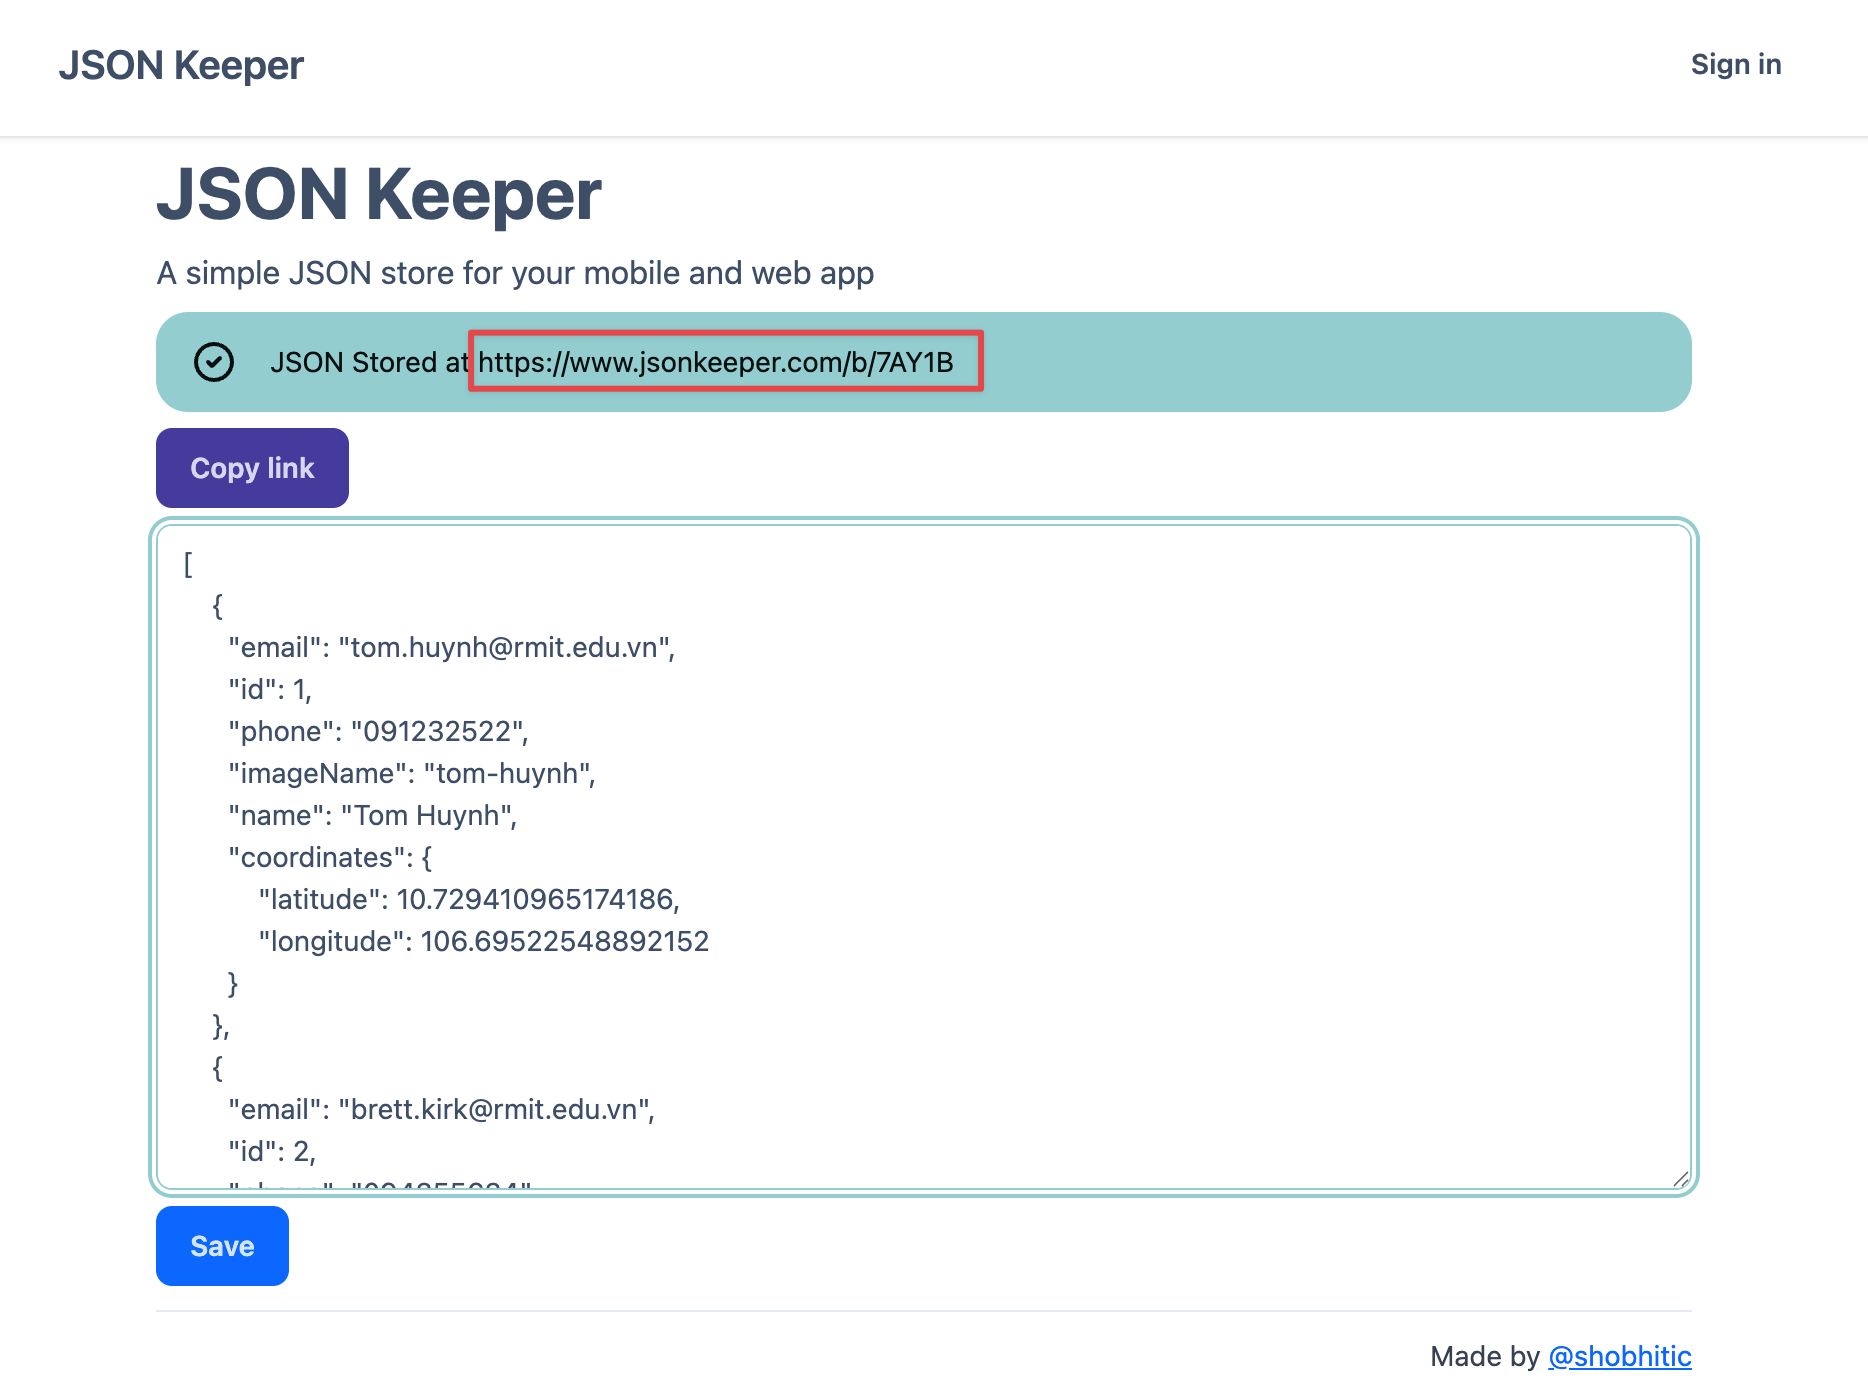
Step 4.1: Host Your JSON with JSON Keeper
Instruction: To fetch data from a URL, you first need to host your JSON file
online. A simple service for this is JSON
Keeper. Copy the entire content of your contacts.json file, paste it into
the text area on the JSON Keeper website, and click "Save". It will provide you with a public
URL that you can use to access your data.
Explanation: JSON Keeper is a free tool that gives you a permanent URL for your JSON data. This is perfect for prototyping and testing network requests without setting up your own server. The URL it generates will serve your JSON content, which your app can then fetch.
Step 4.2: Modify ModelData.swift to Fetch from a URL
Instruction: Keep the bundled loader from Step 3.1 and add this separate
asynchronous function to ModelData.swift. Replace the example URL with your own
HTTPS URL. Keeping local and remote functions separate makes their different failure modes
visible.
Explanation: URLSession suspends this task while the download is in
progress instead of blocking the interface. After the bytes arrive, the same
JSONDecoder used for the bundled file turns them into [Contact].
The HTTP status check catches server errors before decoding.
// Model/ModelData.swift
import Foundation

func fetchContacts(from url: URL) async throws -> [Contact] {
    let (data, response) = try await URLSession.shared.data(from: url)

    guard let httpResponse = response as? HTTPURLResponse,
          200...299 ~= httpResponse.statusCode else {
        throw URLError(.badServerResponse)
    }

    return try JSONDecoder().decode([Contact].self, from: data)
}
In ContactList, store the downloaded result as view state and start the work with
.task. Show loading, success, and error as different states:
@State private var remoteContacts: [Contact] = []
@State private var errorMessage: String?

private let contactsURL = URL(
    string: "https://www.jsonkeeper.com/b/REPLACE_ME"
)!

var body: some View {
    Group {
        if let errorMessage {
            ContentUnavailableView(
                "Could Not Load Contacts",
                systemImage: "wifi.exclamationmark",
                description: Text(errorMessage)
            )
        } else if remoteContacts.isEmpty {
            ProgressView("Loading contacts...")
        } else {
            List(remoteContacts) { contact in
                ContactRow(contact: contact)
            }
        }
    }
    .task {
        do {
            remoteContacts = try await fetchContacts(from: contactsURL)
        } catch {
            errorMessage = error.localizedDescription
        }
    }
}
Verify: first use the working URL, then temporarily change it to an invalid path. The first run should show contacts and the second should show an error without freezing or crashing. An empty array is valid data, so a production app would track an explicit loading state rather than using emptiness as the loading signal.
👋 5. Building a Welcome Screen
Step 5.1: Organize Your Welcome Views
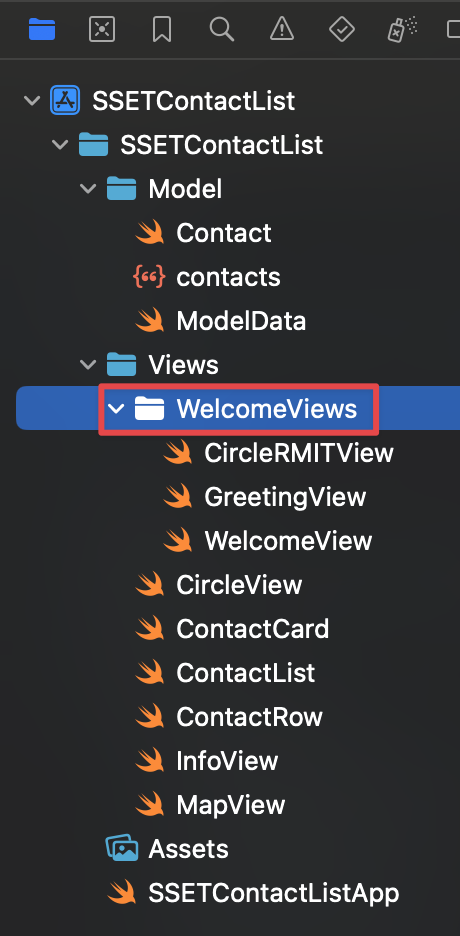
Instruction: To keep our project tidy, create a new folder inside the
Views folder and name it "WelcomeViews". This is where we'll put all the components
for our new welcome screen.
Explanation: As features grow, group views by feature rather than piling them
into one folder. Your Views folder already holds six files from Part 1; the three
new ones belong together and have nothing to do with contacts, so they get their own home.
The rest of this section is a change of subject: no more JSON. You are building a welcome screen
that appears first and hands over to your contact list when the user taps a button, and along
the way you meet the two property wrappers that drive almost every interactive SwiftUI app,
@State and @Binding.
Step 5.2: Create the Decorative Circle View
Instruction: Inside the "WelcomeViews" folder, create a new SwiftUI View file
named RMITCircleView.swift.
Explanation: This view is pure decoration, and it is a nice reminder that
shapes are just views. A ZStack layers two Circle()s of the same
260-point size, each drawn with .stroke() so only the outline is painted. The
difference is lineWidth: a thin 40-point ring and a thick 90-point one, both at
40% white, so where they overlap the colour builds up into the banded target effect. The logo
goes on top.
Try changing the two line widths and watch the Canvas; five seconds of fiddling teaches more
about strokes than a paragraph can. Note also that this view takes no parameters at all, unlike
the CircleView from Part 1, because there is nothing about it worth varying.
// Views/WelcomeViews/RMITCircleView.swift
import SwiftUI

struct RMITCircleView: View {
    var body: some View {
        ZStack {
            Circle()
                .stroke(.white.opacity(0.4), lineWidth: 40)
                .frame(width: 260, height: 260, alignment: .center)
            Circle()
                .stroke(.white.opacity(0.4), lineWidth: 90)
                .frame(width: 260, height: 260, alignment: .center)
            Image("rmit-logo-white")
                .resizable()
                .scaledToFit()
                .frame(width: 300)
        }
    }
}

#Preview {
    RMITCircleView()
}

Step 5.3: Create the Greeting View
Instruction: Create another file in "WelcomeViews" folder named
GreetingView.swift. This view will contain the main content of the welcome screen.
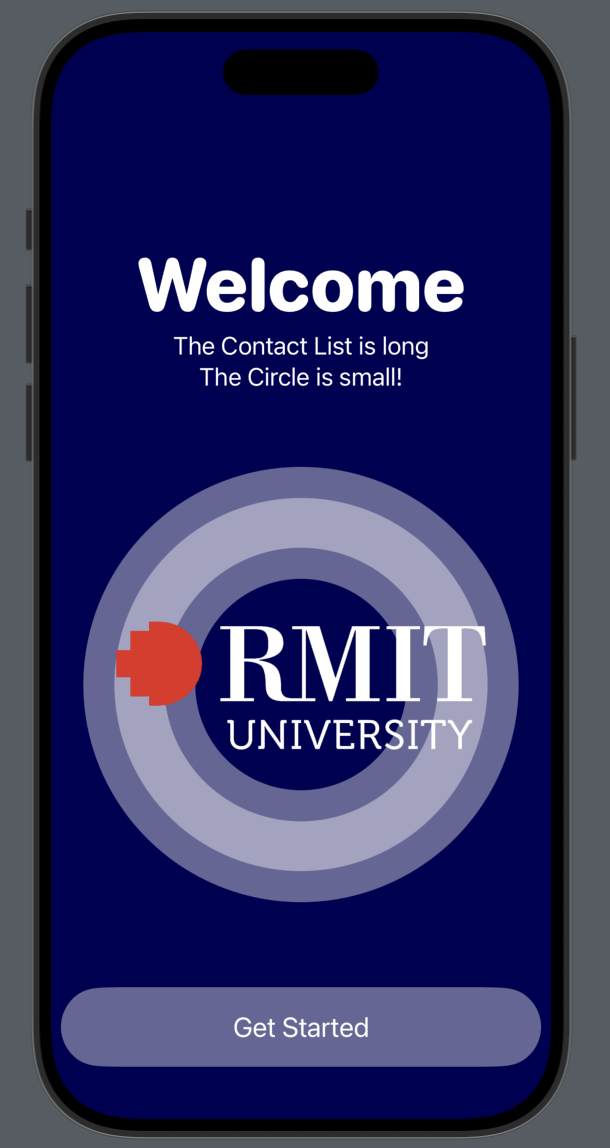
Explanation: GreetingView assembles the text, the
RMITCircleView and the "Get Started" button. The important line is
@Binding var active: Bool.
A view's ordinary properties are read-only inputs: ContactRow receives a
Contact and displays it, and that is that. This view needs to do something
different, namely reach back out and switch off a value that somebody else owns.
@Binding is exactly that: not a copy of the value, but a two-way reference to
where the real one lives. Writing active = false here changes the parent's
property, and every view that depends on it redraws.
The rule of thumb worth memorising: one owner, many borrowers. Whoever holds
the truth declares it with @State; anyone who needs to change it borrows it with
@Binding. Step 5.4 shows the owner's side of this same connection.
Two smaller things in this file: the triple-quoted """ block is a multi-line
string literal, which lets the greeting keep its line break without \n; and
Spacer() is an invisible view that expands to push its neighbours apart, which is
how the content spreads evenly down the screen.
The preview cannot supply a real binding because there is no parent view to own the value, so it
passes .constant(true), a fake binding that always reads true and
quietly ignores writes. Previews of any view with a @Binding use this trick.
// Views/WelcomeViews/GreetingView.swift
import SwiftUI

struct GreetingView: View {
    @Binding var active: Bool

    var body: some View {
        ZStack {
            Color("rmit-blue")
                .ignoresSafeArea()

            VStack {
                Spacer()
                Text("Welcome")
                    .font(.system(size: 60, weight: .heavy, design: .rounded))
                    .foregroundStyle(.white)
                Text("""
                    The Contact List is long
                    The Circle is small!
                    """)
                .font(.title3)
                .foregroundStyle(.white)
                .multilineTextAlignment(.center)

                Spacer()

                RMITCircleView()

                Spacer()

                Button(action: {
                    active = false
                }, label: {
                    Capsule()
                        .fill(.white.opacity(0.4))
                        .padding(8)
                        .frame(height: 80)
                        .overlay(
                            Text("Get Started")
                                .font(.title2)
                                .foregroundStyle(.white)
                        )
                })
            }
        }
    }
}

#Preview {
    GreetingView(active: .constant(true))
}
💡 If the lecture code looks slightly different: the lecture recording may
still show .edgesIgnoringSafeArea(.all) and .foregroundColor(...).
Both are deprecated, so every snippet in these guides is written with their modern
replacements, .ignoresSafeArea() and .foregroundStyle(...). The old
spellings still compile and behave identically, so your project will run either way, but type
what you see here.
Step 5.4: Create the Main Welcome View (State Holder)
Instruction: Create the final view for this feature,
WelcomeView.swift, also in the "WelcomeViews" folder.
Explanation: This is the owner's side of the connection you set up in Step 5.3.
@State private var isWelcomeActive = true declares the single source of truth:
SwiftUI stores that Bool outside the struct and keeps it alive across every
redraw, and any change to it re-runs body.
The if then simply picks a screen. When isWelcomeActive flips to
false, SwiftUI re-evaluates body, takes the other branch, and your
Part 1 ContactList appears in place of the greeting. No navigation, no dismissing,
just a different view being described.
The dollar sign in GreetingView(active: $isWelcomeActive) is the piece to remember.
Plain isWelcomeActive is the value, true or false, while
$isWelcomeActive is the binding to it, the two-way handle that lets the
child write back. Pass the value and the child gets a dead copy; pass the binding and the
button works.
💡 Enhancement: because the switch is just an if inside a
ZStack, you can animate it. Wrap the assignment in the button as
withAnimation { active = false } and add
.transition(.opacity) to the branches for a gentle cross-fade.
// Views/WelcomeViews/WelcomeView.swift
import SwiftUI

struct WelcomeView: View {
    @State private var isWelcomeActive: Bool = true

    var body: some View {
        ZStack {
            if isWelcomeActive {
                // Display welcome screen
                GreetingView(active: $isWelcomeActive)

            } else {
                // Display Contact list screen
                ContactList()
            }
        }
    }
}

#Preview {
    WelcomeView()
}
Step 5.5: Update the App Entry Point
Instruction: Finally, update SSETContactListApp.swift to make
WelcomeView the root view of the app.
Explanation: This replaces the ContactList() you put here at the
end of Part 1. The entry point stays a one-liner because all the decision-making lives inside
WelcomeView, which owns the state and picks the screen. An app file that only ever
names its root view is a sign your structure is right.
Run it now: the welcome screen appears, "Get Started" reveals your contact list, and every card still works exactly as before. Then commit to Git, because Part 2 is done.
// SSETContactListApp.swift
import SwiftUI

@main
struct SSETContactListApp: App {
    var body: some Scene {
        WindowGroup {
            WelcomeView()
        }
    }
}
✨ 6. Final Polish & Deployment
✅ Finishing Checklist
Before considering the project complete, run through this checklist:
- Polished Views: Ensure all your views have consistent padding, fonts, and colors. The UI should look clean and intentional.
- App Icon: Verify that your custom app icon is correctly configured in
Assets.xcassetsand appears on the device or simulator. - Image Assets: Check that all images in your asset catalog have their 1x, 2x, and 3x variants to look sharp on all devices.
- Physical Device Deployment: Deploy and test the app on an actual iPhone. This is the best way to check for performance issues and see how the app truly feels.
🏆 7. Bonus Challenge: Build an App with a Public API
⚔️ A Wild Challenge Has Appeared!
Ready to apply your skills to a new project? The goal of this challenge is to build a simple but polished app from scratch that fetches and displays data from a free, public API.
- Find an API: Choose an interesting API from a curated list like this one: List of Free Public APIs. Topics range from crypto and food to movies and anime.
- Analyze the JSON: Once you have an API endpoint, look at the JSON it returns. If it's complex, use a tool like JSON Beautifier to make it more readable.
- Build the App:
- Create the
Codablestructs for the JSON data (use QuickType!). - Design a list view to show the items and a detail view for more information.
- Polish the UI and deploy it to your phone!
- Create the
Some APIs can have complex JSON structures that are challenging to parse. Before tackling a big one, it's a great idea to start with something simpler. Here are a few fun, easy-to-use APIs with very simple JSON responses:
- The Cat Fact API: Get random cat facts. URL: https://catfact.ninja/fact
- The Dog API: Get a random dog image. URL: https://dog.ceo/api/breeds/image/random
- PokéAPI: Get data about Pokémon. Let's start with Ditto! URL: https://pokeapi.co/api/v2/pokemon/ditto
- Chuck Norris Jokes API: Get a random Chuck Norris joke. URL: https://api.chucknorris.io/jokes/random
- Genderize.io API: Predict the gender of a name. URL: https://api.genderize.io?name=peter
- The Yes/No API: Get a "yes" or "no" with a GIF. URL: https://yesno.wtf/api
Example Idea: Once you're comfortable, a great but more challenging place to start is the Jikan API, a free and well-documented REST API for anime information. Be aware that its JSON structure is more complex, which makes it a good exercise in parsing nested data. For the example app shown, it uses the endpoint https://api.jikan.moe/v4/top/anime to fetch the top anime. You can read the documentation for this specific endpoint here to understand the structure of the JSON response. You could build an app that shows a categorized list of top anime, similar to the demo shown in the lecture.
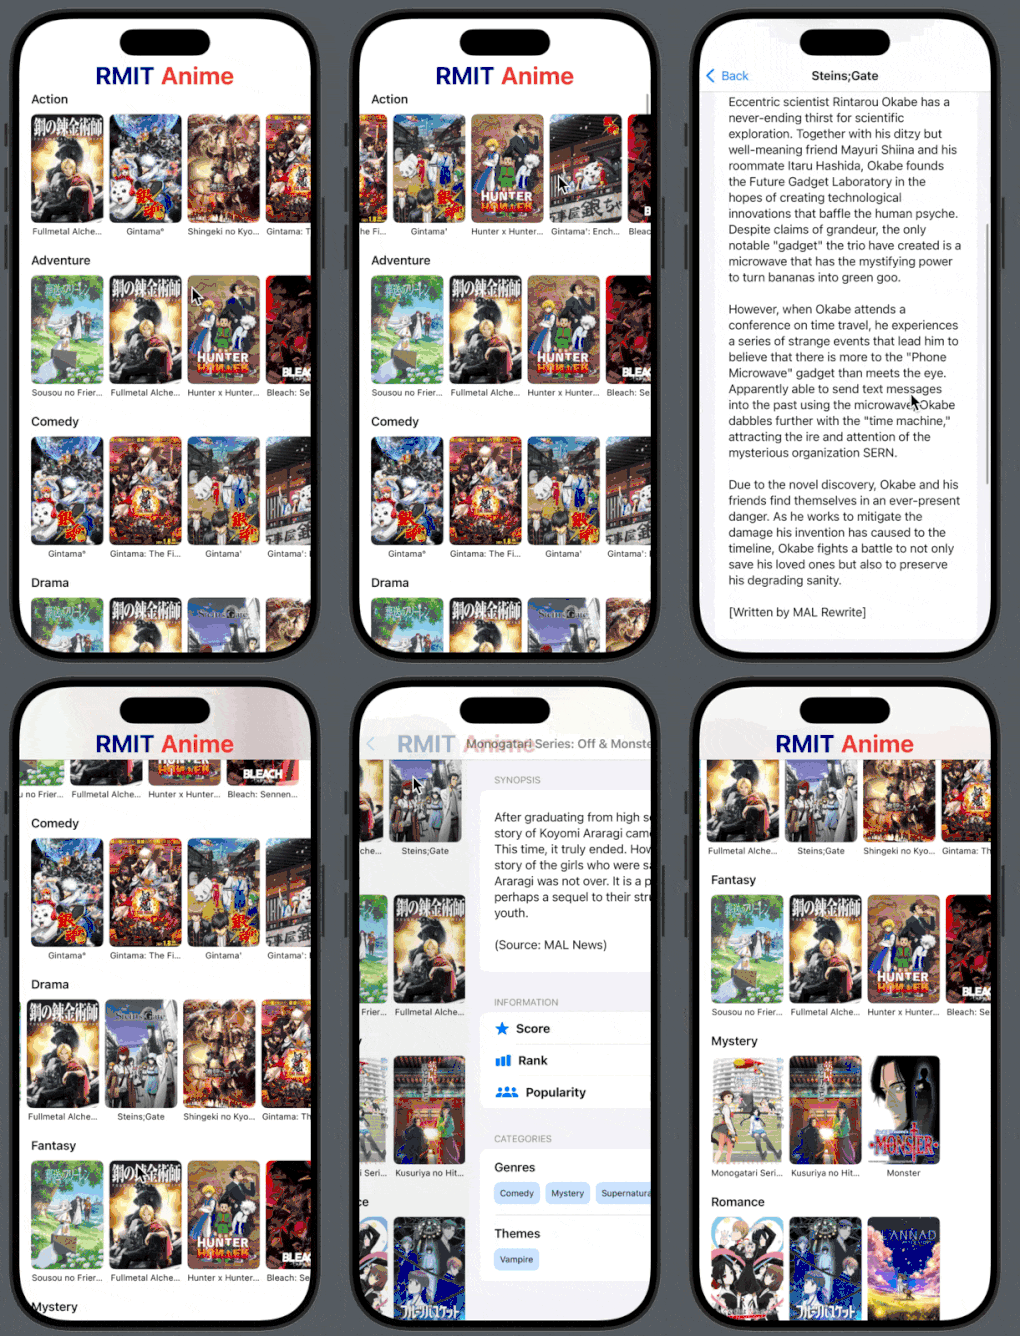
💡 Hint: Getting Started with the RMIT Anime App
Here is some starter code to begin your RMIT Anime app. This code will help you decode the
Anime struct from the Jikan API endpoint, focusing on retrieving the anime
title and its synopsis.
Two things here are worth studying, because they are the differences between a tidy JSON file you wrote yourself and a real API you do not control:
- The response is wrapped. Jikan does not return a bare array; it
returns an object with a
"data"key holding the array. So we need two structs, and we decodeAnimeResponse.selfrather than[Anime].self. Whenever decoding fails on a real API, the first thing to check is whether your structs mirror the JSON's actual nesting. - The API key is
mal_id, but Swift properties use lower camel case. ThemalIDproperty is mapped to the API key withCodingKeys, while the computedidsatisfiesIdentifiable.
Project Folder Structure
CodableTesting
├── Model
│   ├── Anime.swift
│   └── ModelData.swift
├── RMITAnimeApp.swift
└── Views
    └── AnimeListView.swift
File: Model/Anime.swift
import Foundation

// This struct corresponds to the top-level JSON object from the API.
struct AnimeResponse: Codable {
    let data: [Anime]
}

// This struct represents a single anime object from the "data" array.
// It conforms to Codable to be decodable from JSON.
// It conforms to Identifiable so SwiftUI's List can uniquely identify each row.
struct Anime: Codable, Identifiable {
    let malID: Int
    let title: String

    // The description of the anime
    let synopsis: String

    private enum CodingKeys: String, CodingKey {
        case malID = "mal_id"
        case title
        case synopsis
    }

    // Use malID as the unique ID required by the Identifiable protocol.
    var id: Int {
        malID
    }
}
File: Model/ModelData.swift
import Foundation

let animeURL = URL(string: "https://api.jikan.moe/v4/top/anime")!

func fetchAnime() async throws -> [Anime] {
    let (data, response) = try await URLSession.shared.data(from: animeURL)

    guard let httpResponse = response as? HTTPURLResponse,
          200...299 ~= httpResponse.statusCode else {
        throw URLError(.badServerResponse)
    }

    return try JSONDecoder()
        .decode(AnimeResponse.self, from: data)
        .data
}
File: RMITAnimeApp.swift
import SwiftUI

@main
struct RMITAnimeApp: App {
    var body: some Scene {
        WindowGroup {
            AnimeListView()
        }
    }
}
File: Views/AnimeListView.swift
import SwiftUI

struct AnimeListView: View {
    @State private var anime: [Anime] = []
    @State private var errorMessage: String?

    var body: some View {
        NavigationStack {
            Group {
                if let errorMessage {
                    ContentUnavailableView(
                        "Could Not Load Anime",
                        systemImage: "wifi.exclamationmark",
                        description: Text(errorMessage)
                    )
                } else if anime.isEmpty {
                    ProgressView("Loading anime...")
                } else {
                    List(anime) { item in
                        NavigationLink {
                            VStack(alignment: .leading, spacing: 10) {
                                Text(item.title)
                                    .font(.title)
                                    .bold()
                                Text(item.synopsis)
                                    .foregroundStyle(.secondary)
                            }
                            .padding()
                            .navigationTitle("Details")
                        } label: {
                            Text(item.title)
                        }
                    }
                }
            }
            .navigationTitle("Top Anime")
        }
        .task {
            do {
                anime = try await fetchAnime()
            } catch {
                errorMessage = error.localizedDescription
            }
        }
    }
}

#Preview {
    AnimeListView()
}
🎉 Conclusion & Next Steps
🥳 Congratulations!
You moved the source of contact data from Swift code to a bundled JSON resource, then optionally
loaded the same model type from a live URL. The remote version required loading and error UI,
but ContactRow and ContactCard still accepted the same
Contact values. That stable model boundary is the practical benefit of separating
data loading from presentation.
🧠 What you can now explain
- What
Codablesynthesises for you, and the naming and typing rules that let it work. - Why computed properties are invisible to the decoder, and how that lets a struct hold a
SwiftUI
Imageand aCLLocationCoordinate2D. - What the app bundle is and why a resource file has to be a member of the target.
- How to read a
JSONDecodererror and turn it straight into a fix. - Who owns state and who borrows it, via
@Stateand@Binding.
🚀 What's Next?
- Proper data flow: global
var contactsworks for a lab but does not scale. Next you will move to the@Observablemacro and MVVM, so views observe a model object instead of reaching for a global. - Real persistence: decoding JSON is read-only. To let users add and edit contacts that survive a relaunch you need SwiftData, or Firebase for cloud storage.
- Production networking: move the
URLSessionwork and its loading/error state into an observable view model so multiple views can share and test it.